Bios Password

  • Subscribe to our RSS feed.
  • Twitter
  • StumbleUpon
  • Reddit
  • Facebook
  • Digg

Sunday, January 10, 2010

Forensic Memory Capture roundup

Posted on 10:40 PM by Unknown

Due to the recent rounds of troubleshooting, the posts lately haven’t been the meaty material I’ve been setting aside.

I’ve got a massive “new & improved” round-up linkfest bursting at the seams.

Then there is some WinPE 3.0 & DISM notes.

Some stuff acquired by dear friend TinyApps.Org Blog regarding Read-Only Honoring of USB media.

I’m still sitting on a USMT-GUI post that I’ve got to add to a fire-sale post.

Then there is that forensics “Heavy Edition” Linkfest that will I hope won’t take an HRT to get out the door.

In the meantime, for reference purposes, here is a short list of some freeware tools and utilities I have on the old USB stick that can all do memory captures of Windows systems (or are useful from a memory analysis perspective). Probably nothing much new here to find by the pros, it’s more of my own roundup in case I loose my USB utility drive….

Listed in no particular order.

  • WinDD – crafted and updated with love and passion by Matthieu Suiche. From the main page:

    "Windd is a free Windows utility, by Matthieu Suiche, which aims at being used as a swiss-knife to acquire the physical memory by investigators, incident responses engineers, malware analysts, system administrators and kernel developpers. Please notice ALL (32-bits + 64-bits, driver + executable) windd binaries are digitally signed to confirm they are from a trusted source.”
  • Volatility | Memory Forensics – From the page:

    ”The Volatility Framework is a completely open collection of tools, implemented in Python under the GNU General Public License, for the extraction of digital artifacts from volatile memory (RAM) samples. The extraction techniques are performed completely independent of the system being investigated but offer unprecedented visibilty into the runtime state of the system. The framework is intended to introduce people to the techniques and complexities associated with extracting digital artifacts from volatile memory samples and provide a platform for further work into this exciting area of research.”

    For the current news and info on Volatility and many other memory and forensics related topics, please see this quite active blog on Tumbler: Volatility
  • Nigilant32 – Developed by Agile Risk Management LLC. Nigiliant32 runs as a single exe file.

    For specific information see the PDF guide Nigilant32 For First Responders: Active Memory Imaging, “Using Nigilant32 we can image the active physical memory (RAM) of the suspect workstation or server to secure portable media.”
  • MANDIANT Memoryze – From the geniuses at Mandiant.  From their product description page linked.

    MANDIANT Memoryze is free memory forensic software that helps incident responders find evil in live memory. Memoryze can acquire and/or analyze memory images, and on live systems can include the paging file in its analysis.  From the product page linked:
  • MANDIANT Memoryze can:

    • image the full range of system memory (not reliant on API calls).
    • image a process’ entire address space to disk. This includes a process’ loaded DLLs, EXEs, heaps, and stacks.
    • image a specified driver or all drivers loaded in memory to disk.
    • enumerate all running processes (including those hidden by rootkits). For each process, Memoryze can:
      • report all open handles in a process (for example, all files, registry keys, etc.).
      • list the virtual address space of a given process including:
        • displaying all loaded DLLs.
        • displaying all allocated portions of the heap and execution stack.
      • list all network sockets that the process has open, including any hidden by rootkits.
      • output all strings in memory on a per process basis.
    • identify all drivers loaded in memory, including those hidden by rootkits.
    • report device and driver layering, which can be used to intercept network packets, keystrokes and file activity.
    • identify all loaded kernel modules by walking a linked list.
    • identify hooks (often used by rootkits) in the System Call Table, the Interrupt Descriptor Tables (IDTs), and driver function tables (IRP tables).

    MANDIANT Memoryze can perform all these functions on live system memory or memory image files – whether they were acquired by Memoryze or other memory acquisition tools. 

  • MANDIANT First Response – Also from Mandiant.  Also free.  While not exactly a memory capture tool, it does capture many “volatile” elements of a running system on incident response.  Portable and certainly not worth hesitating to keep handy.  Take some time reading to understand how to deploy and use.  Well worth the effort.  From the product description page linked:

    ”MANDIANT First Response is Incident Response management software intended for information security staff, investigators and forensic professionals who respond to computer security incidents. MANDIANT recognizes the importance of investigating any potential computer security incident, and we created MANDIANT First Response to foster diligent, effective and efficient response to these incidents.
  • “MANDIANT First Response provides the ability to remotely collect the volatile data, file lists, registry information, event logs, running processes, running services, file time/date stamps and many other data sources to allow an organization to perform precision strike responses when an incident may have occurred. MANDIANT First Response promotes getting the right information into the hands of the right people quickly and intelligently.

    “MANDIANT First Response contains a Command Console and a First Response Agent. The First Response Agent can be deployed on your infrastructure prior to an incident and run as a service for network-based acquisition of information, or run locally if you're working with individual assets. The data collected by the First Response Agent includes the data used by responders to determine whether an incident occurred or not. The Command Console provides an intuitive graphical user interface and report generating capability to allow your analysts to rapidly review, categorize and report on findings”

  • AccessData FTK Imager Lite version 2.6.1 – portable version contains the ability to capture memory images from live systems.  Also carried handily on my USB stick for incident response and imaging work.
  • Technology Pathways Download ProDiscover Basic Edition (Version 6.1) and also on that page their portable ProDiscover Basic Edition U3 install package (Version 5 Only). The version 6.1 is really cool in that you can capture in both the ProDiscover or Linux dd formats, and not only storage media (hard-drives) but physical memory and BIOS memory as well.  Really cool and easy to use.
  • ManTech Memory DD (mdd) appear to no longer be under development according to this Volatility: MDD takes a bow..... post.  However, if you still need to get it into your toolbox, just in case, you seem to be able to pick up the last copy over at mdd - SourceForge.net. For a bit more info see this ManTech Memory DD: Capture memory on Windows Vista and 2003 Server post over at PenTestIT.
  • VMMap – Microsoft Sysinternals.  Though not specifically a memory-capture tool it can grab and display some useful information regarding memory usage on a Windows system.  From the page:

    ”VMMap is a process virtual and physical memory analysis utility. It shows a breakdown of a process's committed virtual memory types as well as the amount of physical memory (working set) assigned by the operating system to those types. Besides graphical representations of memory usage, VMMap also shows summary information and a detailed process memory map. Powerful filtering and refresh capabilities allow you to identify the sources of process memory usage and the memory cost of application features.
  • “Besides flexible views for analyzing live processes, VMMap supports the export of data in multiple forms, including a native format that preserves all the information so that you can load back in. It also includes command-line options that enable scripting scenarios.”

  • SmInfo: Inside Store Manager of Windows 7 and Windows 2008 R2 with Windd - Matthieu Suiche’s blog – Interesting reading on memory as pertains to the Store Manager in Windows 7.
  • Reply to HBGary — and personal notes.. -- Matthieu Suiche’s blog – There was a “discussion” publically a while back between HBGary folks and Matthiew Suiche regarding the effectiveness and “totality” of his windd memory capture tool. (See the post Windd – Almost there, but not quite… at HBGary’s Shawn’s blog).  Matthieu’s reply linked above is quite an educational read, even for non-memory folks like myself.  Good stuff.
  • HBGary is a commercial outfit that (over-simplifying here) focuses on system malware/threat protection and incident response.  As such they have a lot of tools in their shed to offer folks including their memory-acquisition focused Fast Dump FDPro utility and the Responder Field edition.  As both are marketed (and priced) as high-end commercial products, I’ve not had an opportunity to download and work with either one.  However the FastDump Pro FAQ (PDF) seems quite interesting.  They also offer a FastDump Community Edition (free) which might work just find on most current Windows XP systems.  Quoting…
  • “The community edition of Fastdump supports only 32 bit acquisition up to 4 gigs of RAM and does not support Vista, Windows 2003, or Windows 2008. The community edition can be downloaded free of charge.”

  • Yes. I know. DD should be able to do memory captures as well out of the box.  On the Windows side George M. Garner, Jr’s Forensic Acquisition Utilities at one time had a version in there that could do the same running from a Windows (say WinPE?) OS.  Full System Memory Dumps....  I’m not certain that feature is still included.
  • DEFT Linux and CAINE Live CD along with similar (Helix) come with a Windows-side launcher beyond the expected Linux boot-cd side.  Some of the included Windows tools on them support memory imaging of a running Windows system.
  • Memory Analysis tagged posts on the always informative SANS Computer Forensics, Investigation, and Response bog have a number of great resources to check out. See Best Practices In Digital Evidence Collection and Windows Physical Memory: Finding the Right Tool for the Job for some additional references along with many great commercial ones if you have some greenbacks to spend.
  • Finally, last but never least, Harlan Carvey’s Windows Incident Response blog: memory category has a wide range of tools, thoughts, and tips related to memory in Windows forensics endeavors.  Allocate some time to peruse through them all, and keep your bookmark folder open and handy while you do so.  This is where the real knowledgebase on forensic and incident-response memory acquisition lies.

Please note that I make no claims of expertise in this particular field as I rarely do memory captures and as such really am not in a position (yet) in this post to compare the various pros/cons that each application carries with it from a technical, limitations, or comprehensiveness standpoint.  That will have to wait for a future vacation with the time needed to research them that I don’t currently have.

Also I haven’t even tried to mention all the non-freeware (commercial) tools out there. The afore-linked SANS forensic blog post has a good collection to follow up on, as well as X-Ways Capture ($) which also does volatile memory captures.

That said, if anyone does have any thoughts or perspectives to share on the matter…or additional tools (freeware/open source) left off to share, by all means, please drop a tip in the comment jar.

Cheers.

--Claus V.

Read More
Posted in forensics, Link Fest, utilities | No comments

Windows Firewall, the netsh command, and verbose = enable

Posted on 5:54 PM by Unknown

Back in my Opening Ports in Windows Firewall from Batch files post I found the command-line power (for batch file building) of the netsh command.

In the end I wrote a few variants to a) install a needed application surreptitiously, and b) set the Windows Firewall to open up a needed port to inbound connections from a few specific remote IP address based servers.

Here they are a few examples (with my environmental specifics removed) as built specifically for deployment on our XP Pro systems.  As the first post pointed out, Vista and Windows 7 now has some updated (advanced) items that should be used instead.

Note the setup.exe file is held in the same folder that contains the bat files

For my user-prompted batch-file:

@echo off
echo -
echo To Set up and configure Application and FW-rule, type 1
echo -
echo To cancel, type 2
echo -

set /P  selection=    Type the number and then press Enter:  

If "%selection%" == "1"  goto APP_SETUP
If "%selection%" == "2"  goto end

:APP_SETUP
echo Installing Application applet

Setup.exe

echo Adding Windows Firewall port exception

netsh firewall add portopening protocol=tcp port=portnumber name=app-name mode=ENABLE profile=All Scope=custom addresses = server-ip-address_#1/subnet,server-ip-address_#1/subnet

echo Windows Firewall port opened

:end

and for the “silent” no-prompt bat file:

Setup.exe

netsh firewall add portopening protocol=tcp port=portnumber name=app-name mode=ENABLE profile=All Scope=custom addresses = server-ip-address_#1/subnet,server-ip-address_#1/subnet

Easy Peasy.

Note: those netsh command lines are actually all on one line with no returns like it seems….

Show + “Verbose = enable”

While verifying that I had my netsh line format built correctly, I needed to validate it (specifically the subnet into) against a system I had manually configured and verified was working correctly.

Although I was running the following command, it wasn’t quite giving me the firewall port detail I wanted.

netsh firewall show portopening

It took me some more digging but I found that if I passed the CLI as follows with the verbose = enabled added, I got VERY detailed information on the port settings.

netsh firewall show portopening verbose = enable

This technique can easily generate great data from the command-line for system information audits and incident responses.

From this post: Netsh Commands for Windows Firewall – Microsoft TechNet

show commands

The following show commands are used to display the current configuration:

The show command cannot be used to see the list of exceptions for the public profile, even if the public profile is the current profile. To see the list of exceptions for the public profile, use the Windows Firewall with Advanced Security MMC snap-in, and use the Filter by Profile option in the Actions pane.

  • show allowedprogram [ [ verbose = ] { enable | disable } ]
    Displays the current list of program exceptions for the domain and standard profiles. Use the parameter verbose=enable to see additional details.
  • show config [ [ verbose = ] { enable | disable } ]
    Displays the local configuration information for the domain and standard profiles, including the output of all other show commands. Use parameter verbose=enable to see additional details.
  • show currentprofile
    Displays the current profile in use for the network location type.
    If the current profile is the public profile, then this command shows the standard profile.
  • show icmpsetting [ [ verbose = ] { enable | disable } ]
    Displays the ICMP settings. Use parameter verbose=enable to see additional details.
  • show logging
    Displays the current logging settings.
    If the current profile is the public profile, then this command shows the standard profile.
  • show multicastbroadcastresponse
    Displays multicast/broadcast response settings for each profile.
  • show notifications
    Displays whether the firewall displays pop-up notifications for each profile.
  • show opmode
    Displays the operational mode for the firewall for each profile.
  • show portopening
    Displays the current list of port exceptions for each profile. Use parameter verbose=enable to see additional details.
  • show service
    Displays the service configuration for each profile. Use parameter verbose=enable to see additional details.
  • show state
    Displays the current state information for the firewall. Use parameter verbose=enable to see additional details.

For more info see these additional sources:

  • JSI Tip 8399. How can I report Windows Firewall settings? - WindowsITPro
  • Download details: Troubleshooting Windows Firewall in Microsoft Windows XP Service Pack 2 – Microsoft Download Center

Cheers!

--Claus V.

Read More
Posted in command-line interface, firewalls, forensics, Microsoft, tutorials | No comments

How I banished YouTube pink-psychedelic-dust casting Pixies from my Win7 system

Posted on 5:06 PM by Unknown

Note: this worked for my system specifics…might not work for your rig.

Some time ago I had upgraded my older Shuttle SK41G small-form-factor PC from XP to Windows 7 RC 1 when I lost a volume in a serious-bad way.

It has a AMD Athlon XP 2400+ single-core CPU, 2 GB RAM, a ATA HDD, and a Nvidia GeForce 7600 GS series AGP dual-head card.

The Windows 7 install went great. I loaded up a bunch of extra software and stuff and it seemed quite nice.  In fact, it got a higher “windows experience” rating than my dual-core notebook…probably due to the graphics card.

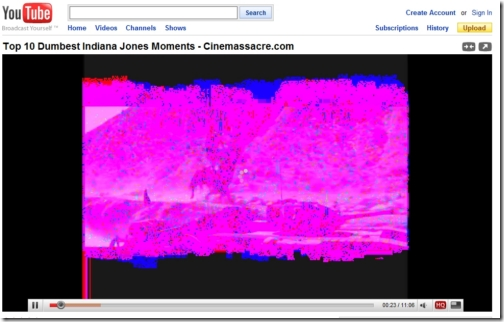
Anyway, the only “issue” I found that bugged me was that when I tried to play YouTube videos in any of my web-browsers, I got a psychedelic pink pixilation effect in the video playback window.

Bizarre!

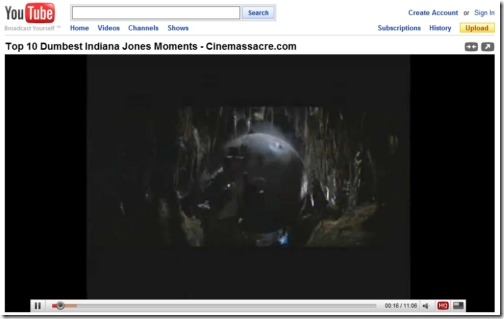
 image

and

 image

(screen caps of playback from this YouTube - Top 10 Dumbest Indiana Jones Moments - Cinemassacre.com link)

My hardware/device driver list showed no errors.  I had done repeated tweaks to the custom Nvidia “control panel” settings to no avail.

Firefox, Internet Explorer, Chrome, Safari, Opera, it didn’t matter.  They all generated YouTube Pink Pixie Dust playback effects for YouTube.

To add to my madness, when I downloaded and played video through the Hulu - Labs: Hulu Desktop client, the video playback was smooth as silk and pixie-dust free. Same thing for Quicktime based videos.

It wasn’t a bandwidth issue as this was connecting via my broadband on a cat-6 wired cable.

None of my other Windows 7 systems were exhibiting any issues.

I was stumped…until last night when I realized what the issue/solution was.

YouTube Pink Pixie Dusters Begone!

Last night found me working on the desktop system after doing the rebuild of Lavie’s laptop.

I had just (again) updated the Shuttle desktop systems Nvidia drivers to the very latest versions, just released.

  • NVIDIA DRIVERS 195.81 BETA – Windows 7/Vista x32 bit driver released 2009.12.15
  • NVIDIA DRIVERS 195.62 WHQL – Windows 7/Vista x32 bit driver released 2009.11.26

Unfortunately neither helped.

However, while catching up on my RSS feedage, I saw this notice:  Adobe Flash Player 10.1 beta 2 now available for PCs and netbooks over at Adobe Labs.

I knew I had installed the 10.1 beta 1 on the system and wondered if this might fix the issue since, yep, YouTube video format is Flash based.

I did so and, no, the Flash 10.1 beta 2 version didn’t help at all.

The Light Brightens in Claus’s grey-Jell-O mold

“Wait!” said I.

If neither the Flash player 10.1 Beta 1 or Beta 2 worked, but other video formats do just fine, might it be related to the Beta version of Flash I was using on this rig and NOT, say, the Nvidia driver(s)?

So I uninstalled the Flash player 10.1 Beta 2 for both the ActiveX and “Other” browser components from my Add/Remove programs list.

Then I went back to the Adobe Flash Player Download Center and downloaded the “current release” versions of Flash player.

Then I replayed the same YouTube video link as above.

 image

There was Indy-Jones running for his life in all his smooth and crystal-clear goodness.

Problem solved.

For some reason the Beta of Flash player 10.1 isn’t having any issues on our Windows 7 laptops (x32 or x64 bit Win 7).  However either the NVidia card I was using and/or the drivers and/or the Windows 7 Ultimate RC1 level was causing the Shuttle rig to attract the YouTube pink pixie-dust Pixies.

Rolling back to the current Flash version fixed the issue easily.

I’ve seen a handful of comments while troubleshooting this issue that seems to indicate other folks also running into the YouTube pink video playback effect.

Maybe this might help…maybe not.

In my case it did.

Now I can watch YouTube things like this that I too really, really need (thanks Isis!) with no pink pixie dust included.

Cheers!

--Claus V.

Read More
Posted in browsers, Shuttle SFF, troubleshooting, video, Windows 7 | No comments

A Valca Oops! How to REALLY enable (hack) Windows 7 Home Premium to run Remote Desktop Connection as a Host

Posted on 4:07 PM by Unknown

reposted and re-edited here for clarity and blog-time continuum harmony.

I get it now “Kevin” if you are still reading this blog "  ;-)

Gentle readers…it has come to my attention via the comments that the post title and content in the following (and now updated) Grand Stream Dreams post…

  • Run Windows Remote Desktop Connection on Win7 “Home” editions – Updated - Grand Stream Dreams

…might be a “bit” misleading.  That was not my intention, but after careful and objective reading of the post now, I clearly find that was the case.

To that end I want to make some important clarifications. 

Then, if you want to carry the Windows 7 RDC “client” binaries on your USB stick for whatever clever reason you need them for, please go on and read that post.

1)  My original desire in that post was twofold:

a) Run Windows RDC from my Windows 7 Home Premium laptop to control my desktop “faux-server” Windows 7 system (currently running Win7 Ultimate RC1), and

b) Be able to use the final Win7 RDC binaries at work on my XP Pro system to RD some XP Pro systems.


If that sounds like what you are interested in doing (and/or what the post title and/or Google led you here for)…then read these bits if you are curious and then hop over to that previous post. 

If not and you really do want to set up (hack/patch) your Windows 7 Home Premium to run RDC with a “host-mode” service not natively supported by Microsoft in that version, then keep reading down to item #5 below before deciding to stay or leave this post…you might be rewarded for doing so.

2) The original nomenclature I had used previously to refer to “host” and “client” in RDC was incorrect (or at least, muddled).  Here is the “official” definitions per Microsoft;  “Remote Desktop Connection is a technology that allows you to sit at a computer (sometimes called the client computer) and connect to a remote computer (sometimes called the host computer) in a different location.”  So the PC you are working at that you are initiating the RDC session from is the client end and the one you are actually remote-controlling is the host end. M’kay?

3) As the table below shows (but is a bit misleading without the above information) ALL versions of Windows 7 allow you to run the Windows 7 RDC client natively. That’s why (as some commenters pointed out) the binaries I noted are actually present on all the Win7 systems.  So following the earlier post instructions really are not necessary UNLESS you want to run the Windows 7 RDC client binaries from a non-Win7 system (XP/Vista/Server) and do so from a USB stick (unless you then offload them to that system locally).

image

creator unknown original image here.  Comment please and I will give credit

4) Based on #3 above, you just don’t need to do the solution (patch/hack) in this post UNLESS you mean to say you want to run Windows Remote Desktop on Windows 7 Home Premium as the HOST.  Then without following the steps in this post, you would be completely helpless (at least as far as using the specific tool Microsoft RDC) per the official Microsoft product description for Win 7 RDC: “You can connect to computers running Windows 7 Professional, Windows 7 Ultimate, or Windows 7 Enterprise. You can't use Remote Desktop Connection to connect to computers running Windows 7 Starter, Windows 7 Home Basic, or Windows 7 Home Premium.” 

Only you actually “can” with Windows 7 Home Premium (x32 or x64).

If that is what you came here looking for…continue on to see item 5 below.

5) To REALLY run Windows RDC in “host-mode” on a Windows 7 Home Premium system  you will need to perform the following steps.

Last course-correction warning: If all you want to do is just remote control another system to help a friend or mate or distant relative out, please look to the very end of this post as there are some great freeware solutions to do so without any mucking around and hacking/patching of Windows System 32 files that this requires (and brings with it possible heartbreak and system-break).

The Patch/Hack to enable Windows 7 Home Premium to run Windows Remote Desktop Connection as a HOST service

  • Note: ONLY do this if you understand what you are doing, what the consequences are, and will accept and adopt as your own blood any security issues or system-stability consequences that might arise if you decide to do this!  Pet hamsters might escape their cages. You might Black or Blue Screen of Death your Windows 7 Home Premium system that works just fine right now.  Seriously.  This really shouldn’t even be considered by anyone except advanced or professional Windows users and administrators.  Seriously. I mean it.  M’kay?  Still want to do it? Fine.  Keep reading then. I warned you that here be dragons and you just wouldn’t listen…

  • Probably want to start by manually making a System Restore Point. .

  • On the Windows 7 Home Premium system, go to Start --> Control Panel –> System.

  • From that window, check the sidebar and find and select “Remote settings” on the left-hand side sidebar.

  • In the “System Properties” window select the “Remote” tab.

  • Check (enable) the “Allow Remote Assistance connections to this computer.”

  • Select “Apply” and “OK”.  Then close all the windows out.

  • Go to this page: How to enable Remote Desktop in Windows 7 Home Premium over at the Tenniswood Blog and follow the link to download the zip file. .

  • Unpack the zip file “Concurrent_RDP_Win7_RTM_patcher.zip”. .

  • Open up the unpacked folder and find the install.cmd file and run it as “administrator” .

  • (Note: On my Windows 7 Home Premium x32 bit laptop it worked fine out of the box. On my Win7 Home Premium x64 AMD system…it errored out as it said the termsrv.dll file didn’t exist.  A CLI search for the file did find it present (but cloaked by the OS) in C:\Windows\System32.  So I had to then disable UAC, reboot, re-run the install.cmd file as “administrator”.  It worked. I then reset UAC and rebooted….)

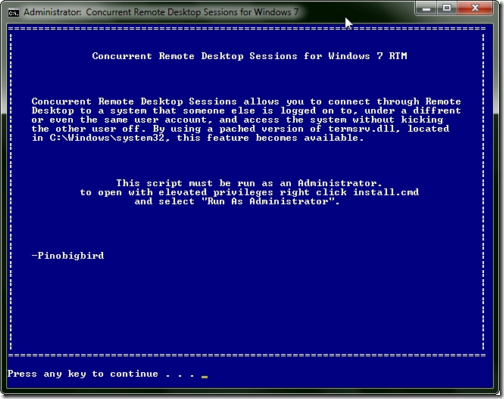
image

  • You will need to decide if you wish to allow “concurrent” (multiple) sessions (let a logged-on user work while you also work on it without force logging out the current user…I select “Y” myself,

image

  • and if you want to enable “blank” password for account login (not have to provide the password)…I select “N” for this.

image

  • Once done (and the process may take a while, particularly when it waits to listen to the service on port 3389) you will be directed to close the window out.  Then you are done!

image

  • Your Windows 7 Home Premium system should now be “patched” to run RCD as a HOST for incoming RDC sessions.

Observations:  This is a hack/patch/mod of a Windows OS file along with some other automagical system configurations that changes the code of the termsrv.dll file, adds the rdpclip.exe file to the system, starts the service, and adds Windows Firewall Rules.  It is completely unsupported by Microsoft.  Future Service Pack release and/or monthly OS security/updates might overwrite and/or break this whole house of cards.  I am a bit smart, but I am not a programmer and cannot certify that the documentation on file patching is all that goes on.  It might allow Martians to mind-control RDC your system.  I just don’t know.  As far as I can tell everything seems legit and quite effective, but your mileage may vary.

Also, if you are running a non Windows Firewall solution, you might need to do some more firewall rule tweaking to get the inbound RDC connection session past your firewall.  Can’t help you there….

Finally as mentioned in the second line of this post, I owe a GSD commenter to this post “Kevin” an apology.  Because my nomenclature was muddled up, I didn’t quite “get” the tipoff he was trying to pass to me on this very technique.  Kevin’s tip and information turned out to be MUCH more valuable (granted to a really small set of Windows Home Premium users) than I realized at the time…including myself!.  Great tip Kevin and a full hat tip to you, mate!

Patch/Hack Extras:

  • How to enable Remote Desktop in Windows 7 Home Premium -Tenniswood Blog – clean post to the zip file.

  • Windows 7 RTM concurrent remote desktop patch - The Green Button – the Uber-team that seems to craft this out for each version of Windows Home OS time after time.  As far as I can tell, it all starts here.

  • Windows 7 Home Premium - Remote Desktop – another RDC forum that pointed to the Tenniswood Blog post.

  • Install and Enable Remote Desktop in Windows XP Home Edition » My Digital Life.  For XP Home Premium users seeking RDC Host enablement.

  • Enable Remote Desktop Connection on Vista Home Premium – Frans goes Blog – For Vista Home Premium users seeking RDC Host enablement.

  • Turn on Remote Desktop in Windows 7 or Vista - the How-To Geek – for lucky folks who do have a version of Windows 7 or Vista that does support the Microsoft OEM enabled RDC Host feature…it isn’t enabled by default out of the box…

Freeware Solutions for Windows supported “Remote Control” Sessions (non RDC – based)

Probably most home users won’t need Windows Remote Desktop Connection nor will (or should) they muck around with this patch…no matter how effective, cool, or useful it might be.  Best left to advanced Windows users.

However, there are LOTS of easy to use and just/more than effective solutions to set up a remote-desktop control sessions between two windows machines.  Like when you want to help that friend or relative out who is stuck on their PC but you don’t want to drive across town in the dead of winter to do so…even for free beer or pizza.

Check these solutions out.

(Re)Listed in a particular order (to me).

  • ShowMyPC – Still simply the easiest way to remote connect to a remote desktop to perform ad-hock connections and desktop control support.  Particularly for non-techie (re: family/friends) end-points.

  • TeamViewer Portable – Lots of reasons I’m thinking of moving to this application from ShowMyPC. That will have to wait for a later post.  Offered by PortableApps.com so its perfectly portable software for your USB drive.

  • LogMeIn - Virtual Networking with LogMeIn Hamachi² along with Free Remote Access from LogMeIn and see also REMOTE DESKTOP WITH HAMACHI ** PLEASE READ ** link. 

  • Mikogo – provide free online meeting and desktop sharing that could be used for remote PC control support in a pinch.  Love the giraffe logo.

  • Comodo Easy VPN and the related page Secure Remote Access

  • Zolved Free Remote Control – not tried it yet personally but seems to get high marks in the blog-o-sphere for family friendly remote control connection building.

  • Shrew Soft Inc : Software.  Yes it’s really a VPN specific solution, but it looks really, really cool.

  • Chris’ Realm’s “Chris Control” – Looks like Chris has some older (circa ‘07) WinPE 1.0 plugins for remote control building. Not played with them yet but wanted to reference anyway.

  • Remote Control :: IntelliAdmin - Remote Administration For Windows -- ($) – I amost didn’t list this one, but it is a good administrative level RC tool.  IntelliAdmin also provides some great freeware sysadmin utilities so check it out.  See also News and Tips :: Remote Control 4.3 Released

Finally all recent Windows builds come with something most folks don’t know called “Remote Assistance” or “Easy Connect”.  It’s also pretty cool, free, and installed on all XP/Vista/Windows7 builds.

  • Windows 7: Easy Connect overview – NeoWin.net

  • Windows 7 Tips – Easy Connect – by Ankit Srivastava at iYogi (…iKnow, but it’s a good post).

  • Remote Assistance in Windows 7: Lending a helping Hand is even easier - Windows Live.

  • Step-by-Step Guide to Remote Assistance – Microsoft TechNet.

  • File transfer over network - Windows 7 Forums and this Homegroup problem to share files on another partition – Microsoft forum post.

Sorry 'bout any confusion.

--Claus V.

Read More
Posted in firewalls, hacks, Microsoft, networking, Remote Support, tutorials, Windows 7 | No comments

Saturday, January 9, 2010

Lavie’s Laptop Teardown

Posted on 10:42 AM by Unknown

Gentle readers of this blog may recall a few previous posts regarding laptop hardware shenanigans in the Valca home.

  •  grand stream dreams: All Healed!
  • grand stream dreams: Laptop DC plug protection hack: Safety on the cheap!

In that case the DC plug in the laptop had broken the solder-connection to the mainboard and I ended up taking it to a local shop down in Webster.  They fixed it up (not cheap) and it was almost good as new.

So it was with some disconcertment that Lavie called me at work about three weeks ago with her Compaq Presario laptop.  Basically, it was dead and wouldn’t power on.

That night when I got home I realized the power was completely drained.  playing around with the AC plug into the DC jack finally got it going again (sign of either a bad cord or damaged DC jack).

I got it charged to 25%, removed some key files off it for her, then shut down to consider the options.

  • Get a new laptop (not really…budget is exceeding tight now).
  • Take it back to the Webster shop (almost as much as a good $ chunk towards a new one).
  • Try to do the repair myself.

In the end I decided to do some research on the last option.

Lavie’s laptop is a Compaq Presario CQ60-215DX model.  Nothing amazing but dependable and good home-use performance.

After some research I was delighted to find that most of these Compaq Presario models don’t have the DC plug directly soldered to the mainboard but use a removable cable module.

Heck.  I’ve built a few systems and field-strip our desktop systems at work.  While stripping down a laptop is highly delicate work, I felt confident I could take it on if budgeting enough time (a whole morning to be safe).

While for my laptop I wasn’t willing to do on-board solder repairs, swapping out modular part is no biggie. (hopefully).

Order Up!

First place I looked was the HP PartSurfer.  HP does allow for ordering of component parts for their systems.  Unfortunately the particular part I was interested in wasn’t carried.

Fortunately I found it at LaptopRepairCo.com out in California: Laptop Repair and New Notebook Parts – Part Number 486835-001.  Just what the Dr. ordered!

I had come across them before when considering just replacing the entire main-board of my laptop but figured I wasn’t quite confident at the time to do so.

After quadruple checking the part was correct (no return policy unless of defect) I placed the order. One really nice thing about the outfit is that they ship UPS with mandatory signature of receipt required.  I can’t say how many times we’ve had other places deliver to us and drop off PC parts and electronics on our doorstop without even bothering to knock or ring the bell.   Once we were sure of the delivery date (via tracking #) Lavie made arrangements to be at the house all day.  

Research

In the meantime I continued to gather how-to material and study it profusely to make sure I understood what I was doing:

  • How to take aprat/disassemble a Compaq presario CQ60 laptop Part 1 - YouTube
  • How to take aprat/disassemble a Compaq presario CQ60 laptop Part 2 – YouTube

These videos started out good but Part 3 never got delivered and I was a bit worried when the tech had to stop because the monster-screwdriver he was using wouldn’t fit in a chassis hole and he couldn’t get the screw out.  Always have the right tools on hand man!

Compaq had a bunch of manuals on-line for the Presario CQ60-215dx notebook.

  • Manuals for Compaq Presario CQ60-215DX Notebook PC - HP Customer Care (United States - English)

Unfortunately I couldn’t find a field technician’s guide.

The have even more user-guides listed off these links for Presario notebook systems: Compaq Presario Notebook PCs

However, to get the field-tech’s guide I had to search quite a while until I hit pay-dirt: c01602064.pdf

Compaq Presario CQ60 Notebook PC
HP G60 Notebook PC
Maintenance and Service Guide
Document Part Number: 488764-002
November 2008

This guide is a troubleshooting reference used for maintaining and servicing the computer. It provides
comprehensive information on identifying computer features, components, and spare parts; and performing
computer disassembly procedures.

This is pretty much everything you need to reference (down to screw types and sizes) when servicing your CQ60 class notebook.  (More notebook model links available here at Laptop Repair Help: HP Compaq laptop manuals with step-by-step disassembly instructions.)

The real “score” was finally at  this “inside my laptop” blog post How to remove motherboard from Compaq Presario CQ50, CQ60 or CQ70 laptop.  It was a gold-mine of photos and annotations, step-by-step.  It clearly showed where my DC plug module was at and all the “gotchas” along the way.  (Although I didn’t have to also tear-down the screen, that is covered as well in this post: how to remove the LCD screen, inverter board and hinges.)

I also knew some of the ribbon connectors are very delicate and tricky.  Nothing like the kinds on a PC desktop system.  So I made sure I had memorized this post at  Laptop Repair Help How to fix broken keyboard connector on laptop motherboard.

On the Bench

The part quickly came in about 7 days after the order.  Everything was great so my confidence in the source is high now and I will use them again, in case any other laptop parts need replacing.  Quite a lot of parts are in stock but many specialty parts on older models in particular are out of stock, so your luck may vary.

This morning I got up, had loose-leaf green tea instead of coffee to steady my hands.  Made cinnamon-rolls and eggs for me and the girls.  After that I warmed my hands up and meditated on the detail work ahead of my by doing a Toy Story Green Army Men Lego Mini-Fig kit by bro had got me.

The actual tear-down and rebuild was almost 100% like in the guide.  I only noted a few potential gotcha’s.

Pulling some of the cable connectors was delicate work.  I found using a pair of tweezers to push them out worked best.  I was afraid of crushing them if I used pliers.  I was only really concerned about slipping and gouging the main-board.  In most cases steady but firm gently rocking the plug loosened them up enough to slip loose.  Also I carefully studied each of the ribbon-cable connectors.  Two types here.  One is a flip-up kind like in step 8 and the other was the push-release kind like in step 7.

image

Notice the yellow-lined pie-tin on the right.  I spayed the yellow paper lightly with aerosol glue and used it to stick the screw heads down on to keep them apart.  (That’s iTunes visualizer in the 2nd monitor with some relaxing Te Deum playing as performed by Arvo Part while I worked—by the way)

I also made a guide to help me keep track of which screws went to which assembly unit as they corresponded to them in the cake-tin.  Yea, I know, kinda OCD there…

image

On Step 10 of the guide, I found an additional wire not included in the model used for the guide.  It appeared to be going to something on the case itself and I couldn’t tell how to remove it. So I kept it together at first which was awkward which meant when I pulled the screen display and laptop’s plastic cover off the chassis frame, I had to keep them together by this single wire.

image

Once I had it all off and could inspect it closer, turns out it was an LED light and was held in by really dark sticky tape.  Gently pulling it away from the plastic housing let it slide right out.

image

imageAnother “gotcha” can be seen in Step 14 of the guide when the cover is separated from the bottom base.  Don’t let  the silver plastic trick you.  The top cover also consists of the laptop’s screen rotation area which is black.  Look closely at the photo in Step 14 and you can see what I mean.  If you think the silver and black parts are different you might pry incorrectly and break the silver/black part join..

Just take your time and the entire top cover part will unsnap OK. Don’t force anything but work around the edge gently with a guitar pick or hard-thin plastic spludger tool and you should be safe.  Patience is a virtue here!

Upon reaching the end at Steps 17 and 18 of the guide Lavie’s Presario CQ60-215dx showed one final deviation from the guide.  Her laptop had a system-board extension fastened to the bottom shell that wasn’t present in the guide’s model.  This is for the DVD-ROM module connection.  Two screws there must be removed.

image

Also noted in Step 17 is to remove four cables. That’s fine until the bottom one which seems to be covered by a wide square of hard plastic glued to the main-board.  Don’t peel it all off.  Look carefully and you will see there is actually a tab of plastic over the wire plug.  Raise that up (might by sticky) and then you can access the connector without any more peeling.

At that point the main-board could easily be removed!

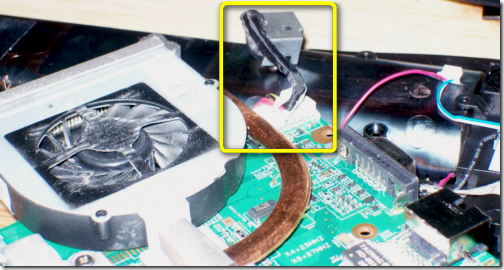
image

And finally for the money, the DC power-plug module finally accessible and ready to be removed and replaced.

image

Re-assembly was much easier and exactly the reverse.  No gotcha’s this time.

Once all together I tested it with a power-up and everything seemed up and operational again.  The DC plug worked again and the system was fully charging.

Since I had to pull the BIOS battery, I had to reset the BIOS settings again.  No biggie.

However, now, for some reason, when the system is powered on, the Wi-Fi no longer automatically comes on.  You have to press the amber Wi-Fi button next to the power button to turn it on manually to “blue”.  Not sure why as that wasn’t required before.  The BIOS is very simple but it is possible something in there for “auto-on” got reset.

I’ve checked all the applicable Win-7 power and network device management options but no fixes so far.  It now acts like Lavie’s old (and now Alvis’s new) Compaq Presario V2575US Notebook PC which has the same behavior.

Not sure but I’ll recheck the BIOS again later.  I might have missed a setting there.

So Lavie is good to go and I’m even more confident after my Operation game on her laptop.

Cheers!

--Claus V.

Read More
Posted in troubleshooting, tutorials | No comments

Sunday, January 3, 2010

Windows Process Tools – Freeware Linkfest

Posted on 3:14 PM by Unknown

image

cc attribution “thinkpadx32 under X ray” by jeroyang

I’ve been holding onto this pile for quite a while and it has come time to release it into the wild.

These are all the major Windows process tools and utilities I have come across and used from time to time.

Besides the first two sets, the rest really aren’t listed in any particular order or ranking.

Please note there are some great CLI-based tools as well but those will have to wait.  We are focusing on GUI tools for now.

Of course, there is still the Windows Ctrl-Alt-Del “Task Manager” but except all but the average users, it just doesn’t have the horsepower to cut it in exploring, understanding, and manipulating running processes.  I think of it as the training wheels of a kiddo’s bike. Once you’ve gotten used to it, time to take it off and graduate to the real-deal.

Crème-of-the-Crop

These (IMHO) are simply the best of the class.  With practice, familiarity, and repeated usage it’s hard to turn to any other tool.

  • Process Explorer – Microsoft Sysinternals.  Simply the best. Nothing else to say.

  • SystemExplorer – Actively updated, this program provides more muscle that the standard task-manager, but presents the information in a user-friendly way.

  • Free Extended Task Manager – The tabbed interface is nice and makes browsing between features pretty simple.  Very similar in style to the default task-manager application, should be good enough for most users.

Style is the Thing

Not to say that these alternative process explorers don’t also have substance, but each seems to deliver the basic Windows process management tools in different GUI formats.  You might find some features special to a particular application but overall, if you find one you are comfortable with using, awesome.  Stick with it.

  • Security Process Explorer.

  • Process And Port Analyzer 2.0 - real time process, port and network connections analyzer. Download link via Softpedia.

  • AnVir Task Manager Free.

  • MKN TaskExplorer 5.  For more information see this Better Windows task management with MKN TaskExplorer post over at Download Squad

  • Yet Another Process Monitor (YAPM) – cute and neat tool.  CyberNet had a good review of the utility in their YAPM: Process Manager with a Ribbon UI post.

  • Accueil – Bill2’s Process Manager.  Yep. Site in French.  (screenshots.) Just download, unpack and switch the language to English and you should be set.  Lots of nice features in a well designed GUI.  See this ghacks review post of the tool for more information to get started with.

  • Process Hacker – Another nice tool but be aware that it does require .NET 2.0 or higher to run, and that while supporting x32 and x64 bit systems, some features only enabled in x32 OS versions.

Targeted Process-Related Tools

I think of these as specialized tools that interact and support the Windows process tools listed above.  When coupled with the information that the “standard” process explorer tool provides, these supplement that information when hunting down malware or studying the extended behavior of a running process.

  • Process Monitor – Microsoft Sysinternals.  Goes hand-in-hand with Process Explorer.  Great logging tool when tracing just what activity a process does on your system.

  • OpenedFilesView – Nirsoft - View opened/locked files in your system and the processes that control them.

  • mst IsUsedBy – mst software – another tool to see what has opened a particular file on your system.

  • ProcessActivityView – Nirsoft - Show file activity summary/logging for a specific selected process. Unlike Process Monitor that captures everything and then you filter for what you want, PAV is used to select a specific process and log activity for that process.  Particularly useful when logging program installation processes to see what and where they install stuff to.

  • CurrPorts – Nirsoft – shows what ports all the running processes have open.  Really useful. Updated often and in both x32 and x64 versions for Windows.  The cat’s meow. 

  • VStat - Robin Keir – Similar to CurrPorts and my preferred tool (only from a GUI perspective) for port monitoring of processes on XP systems at work.  Nir’s CurrPorts is still a bit better, however. 

  • TCPView for Windows – Microsoft Sysinternals – I don’t use this one often anymore since finding CurrPorts and VStat but hey, it’s Sysinternals.

  • WinLister – Nirsoft - Display the list of opened windows on your system for matching up processes to displayed windows.

  • Window Seizer – Alex Nolan – GUI-rich tool for matching and manipulating the location of windows.  I use this when I have undocked my laptop from the secondary monitor and then when I launch and app and it appears on the “phantom” 2ndary monitor, I hit the “Move to 1,1” button to bring it back to my visible monitor surface.

  • WinPatrol 2010 (Free) and WinPatrol ToGo- Bill Pytlovany – See also the fantastic tool ($) WinPatrol 2010 Plus.  All great tools for keeping an eye on and controlling processes on your system (and then some!).

  • ScTagQuery.  This is some CLI stuff but was too good not to include.  From the developer’s description “ScTagQuery allows you to obtain precise information on which threads in the system are being used by what service, in order to better gauge CPU and resource usage as well as to help in debugging service-related problems.  ScTagQuery can be used to map service tags to a service either on a live system, or by running the tool on the same system as where a crash dump occurred, since service tags remain the same after reboot. Apart from mapping service tags to services, and querying the service tag for a thread, ScTagQuery can also show system-wide tag information, as well as dump the name of each service associated to any thread on the system.”  for more info see this blog post by the developer: ScTagQuery: Mapping Service Hosting Threads With Their Owner Service

  • MemInfo.  Again another CLI tool and memory specific, but does have some nifty tie-ins to processes.  “MemInfo is a tool to query information on the state of the memory manager page lists, page frame number (PFN) database entries, per-component and per-process memory usage, and for mapping virtual to physical addresses (for certain kinds of kernel-mode pointers).  It can also display the physical memory ranges available for use by Windows and reported by the BIOS and/or ACPI tables. MemInfo can help detect bad or damaged memory sticks by displaying the size of the bad page list, as well as help in detecting certain kinds of malware or rootkits by showing processes that tools other than the kernel debugger may not show as present. It can also be used to diagnose certain situations where the number of memory available to Windows is different from the amount of memory installed on the system.”  More info?  See the blogpost MemInfo: Peer Inside Memory Manager Behavior on Windows Vista and Server 2008 

  • Svchost Process Analyzer – Tool to focus specifically on the mysterious Svchost processes - a svchost.exe file checker.  “The free Svchost Process Analyzer lists all svchost instances and checks the services they contain.”

Incident Response Specific Process Tools

While these tools are specifically geared towards the incident responder and forensics dude/dudettes, sysadmins could find they provide a particular level of process and/or static file capture and analysis that the aforementioned tools don’t natively provide.  They might help with sorting of initial data on processes.

  • MANDIANT’s Red Curtain – Quoting…”MANDIANT Red Curtain is free software for Incident Responders that assists with the analysis of malware.  MRC examines executable files (e.g., .exe, .dll, and so on) to determine how suspicious they are based on a set of criteria.  It examines multiple aspects of an executable, looking at things such as the entropy (in other words, randomness), indications of packing, compiler and packing signatures, the presence of digital signatures, and other characteristics to generate a threat "score."  This score can be used to identify whether a set of files is worthy of further investigation.”

  • MANDIANT Memoryze.  No other good way to describe it so here it is direct from Mandiant’s product page:

MANDIANT Memoryze is free memory forensic software that helps incident responders find evil in live memory. Memoryze can acquire and/or analyze memory images, and on live systems can include the paging file in its analysis.

MANDIANT Memoryze can:

  • image the full range of system memory (not reliant on API calls).
  • image a process’ entire address space to disk. This includes a process’ loaded DLLs, EXEs, heaps, and stacks.
  • image a specified driver or all drivers loaded in memory to disk.
  • enumerate all running processes (including those hidden by rootkits). For each process, Memoryze can:
    • report all open handles in a process (for example, all files, registry keys, etc.).
    • list the virtual address space of a given process including:
      • displaying all loaded DLLs.
      • displaying all allocated portions of the heap and execution stack.
    • list all network sockets that the process has open, including any hidden by rootkits.
    • output all strings in memory on a per process basis.
  • identify all drivers loaded in memory, including those hidden by rootkits.
  • report device and driver layering, which can be used to intercept network packets, keystrokes and file activity.
  • identify all loaded kernel modules by walking a linked list.
  • identify hooks (often used by rootkits) in the System Call Table, the Interrupt Descriptor Tables (IDTs), and driver function tables (IRP tables).

MANDIANT Memoryze can perform all these functions on live system memory or memory image files – whether they were acquired by Memoryze or other memory acquisition tools. 

  • Nigilant32

    Nigilant32 is an incident response tool designed to capture as much information as possible from a running system with the smallest potential impact. Nigilant32 has been developed with Windows 2000, XP, and 2003 in mind, and should work fine with computers running one of those operating systems. Nigilant32 is beta software and may not work in all instances.

        * Nigilant32 For First Responders: The SnapShot,Using Nigilant32 we can review and save a report of the running system that includes Processes, Services, User accounts, Scheduled Tasks, Network Ports, etc.

    It can also perform sector viewing and memory imaging.

  • NTCore - Explorer Suite and PE Detective – really designed for hard-core programmers and PE analysts.  It does have some tools to help explore processes associated with executables.

  • ESET SysInspector - “ESET SysInspector is a free, state of the art diagnostic tool for Windows systems. It is also an integral part of ESET Smart Security 4 and ESET NOD32 Antivirus 4. It peers into your operating system and captures details such as running processes, registry content, startup items and network connections.”  From there it performs heuristic analysis on the processes and reports them.  This can help narrow your examination. More in this older GSD post SysInspector: New System Utility from ESET

Mostly Process Manipulation Tools

These additional tools are really, really targeted for working with and manipulating running Windows processes.  Best left to the folks who know what they are doing.  Can do some really cool things, but also bork-things-out bad if not done correctly.

  • Daphne – Tool to kill, control, and debug processes.  No-frills GUI. See this Download Squad post for more info as well as this Daphne Process Explorer 1.37 PortableApps beta version.
  • Seem - System Eyes and Ears Monitor – Multi-purpose tool that includes process exploration along with other disk and rootkit hunting features.
  • Prio - Priority Saver – Process priority level manipulator.  Process Explorer (and others) also do this, but this is a specific tool for that task. Particularly valuable if you need to “permanently” set the priority to work that way at launch each time.  See also this GSD post Windows CPU throttling techniques for lots more, including Process Lasso
  • PMW (Process Manager For Windows) – Interesting as this tool adds process priority controls to the right-click menu for the running process item.
  • Home Page: Spy++.  Spy++ (SPYXX.exe) was a Microsoft tool that “…that gives you a graphical view of the system’s processes, threads, windows, and window messages.”  Unfortunately it is really hard to find nowdays. 
  • ManagedSpy – appears to be the replacement tool for Spy++.  “ManagedSpy displays managed controls, properties, and events. ManagedSpyLib allows you to programmatically access Windows® Forms controls in another process. You can get and set properties and sync on events in your own code. ManagedSpyLib can also help you build test harnesses and can perform window, message, and event logging.”  Really for programmers and debuggers, it can sometimes extract useful info for process and executable analysis.
  • Increase Windows Stability via ghacks notes the tool xTra Windows Stability which offers to control and manage processes.  Appears XP specific and I haven’t messed with it on Vista/Win7.  There was a comment in the page from Kris that says:
  • This will just modify three registry keys – you might as well just use the .reg file rather than a program dedicated to it.

    Windows Registry Editor Version 5.00

    [HKEY_CURRENT_USER\Software\Microsoft\Windows\CurrentVersion\Explorer]
    “DesktopProcess”=dword:00000001

    [HKEY_CURRENT_USER\Software\Microsoft\Windows\CurrentVersion\Explorer\Advanced]
    “SeparateProcess”=dword:00000001

    [HKEY_CURRENT_USER\Software\Microsoft\Windows\CurrentVersion\Explorer\BrowseNewProcess]
    “BrowseNewProcess”=”Yes”

    (note that the .reg file needs to be saved with ANSI encoding for Windows to recognise it).

    I have put a copy here for your convenience:
    http://a.nfshost.com/separate_processes.reg

  • RunScanner – Sort of rolls up a variety of startup/process capture tools into one. Useful for troubleshooting a malware infected system with a non-technical end-user.
  • Alin Constantin's WinCheat – Another process and debugging tool of sorts loaded with special sauces.

* Pick visible windows with the mouse and see information about them (like MsSpy++ does, but identifying better the window usnder the cursor).
* Explore the windows hierarchy of the current desktop.
* Allow to see and modify windows styles
* Send/post messages to windows, enable/disable/show/hide them
* Capture the text from windows (and yes, this works for password fields on WinNT/Win2000/WinXP)
* Capture/save window content as bitmap
* Magnify a rectangle on screen following the mouse movements

Related Posts

  • System Process Tools – Grand Stream Dreams Blog.
  • 3 Tools To Manage Windows Processes Better - MakeUseOf.com.
  • Five Best Windows Task Manager Alternatives - Lifehacker.
  • I will kill thee a hundred and fifty ways...freely – Grand Stream Dreams Blog..

Enjoy!

--Claus V.

Read More
Posted in Link Fest, utilities | No comments

Windows Things…

Posted on 1:02 PM by Unknown

image 

cc attribution: "4 Windows" on Flickr by gmahender

Odds-n-ends for Windows things.

  • Enable the secret ‘GodMode’ in Windows 7 –ithinkdifferent.  Spotted in Tweakfest! Enable God Mode in Windows 7  - TechBlog. This pretty cool for admins and heavy system tweakers.  I’ve been using the free utility Windows Access Panel for quick-jumps to commonly-used Windows 7 elements, but this looks mongo-cool.  I set my view to “small icons” after checking out the different views and it is grouped by type (to some degree).  Still, there’s a lot to sort out.  While Vista and Win7 share many of the same feature and setting locations, I’m still learning them after all these years with Vista.  Anything that helps round them up into a more browse-able format is a plus in my book.  Update: See Ed Bott’s take on the tweak and what is really going on.  That "God mode" Explorer trick does less than you think .  I still think its a useful way to find control items as I haven’t mastered the type-search-n-find method quite yet…

  • Folder Sharing between Windows 7 and VM – Windows Virtual PC blog – sharing folders isn’t as intuitive under Virtual PC now as it was under Virtual PC 2007.  This post lists two tricks you can easily follow to set up a simple folder sharing connection between your VM and Windows 7 host system.

  • Elevation PowerToys for Windows - blog.  There is some really, really cool and powerful stuff in this new-to-me blog.  Elevation PowerToys allow focused rights elevations for specific scenarios and contexts that just don’t quite work smoothly using normal techniques.  For some coolness applications see these links:
    • Explore as Administrator PowerToy  - tool plus tips to set up an elevated file-explorer browser alternative.
    • Free Elevation PowerToys for working with User Account Control – CMD prompt here as System.  Wow.
    • Utility Spotlight: Script Elevation PowerToys for Windows Vista – CMD prompt here as Administrator 

  • Virus scanning recommendations for computers that are running Windows Server 2008 R2, Windows Server 2008, Windows Server 2003, Windows 2000, Windows XP, Windows Vista, or Windows 7 – Microsoft Help and Support Article ID: 822158.  Long title but gist is that by configuring your anti-virus app to exclude these files and locations from scanning you can speed up the scan and possibly avoid corruption as your AV app and the OS fight out over control to these locations/files.  Which means that virus writers now have targeted locations to try to drop their apps into.

  • Win7 Library Tool – freeware - Zorn Software. Windows Libraries are like smart folders.  They contain references to other folders and display the content as if it existed in the library folder.  But it’s really not there, it’s still in the original location.  However, you can’t add network locations to a library folder.  This tool makes it possible.  Spotted via Lifehacker post.

  • Customize Windows 7 Screensavers with the Help from System Screensavers Tweaker  - freeware - Windows 7 hacker.  Maybe you don’t need a third-party screen saver but you are finding the options for the Windows screen savers a bit lacking.  This free utility allows you to fine-tune the existing Microsoft screen savers for Windows 7 a lot more than the native options allow.  More bubbly anyone?

  • How To Sync Your iTunes Library With Your Music Folders – Make Use Of blog clearly sorts out a new iTunes 9 feature of allowing iTunes to manage all your music folders.  Its easier than it looks and this guide makes it pretty clear with great screen shots.

  • The (Near) Final Word on Multi-Monitor Taskbars for Windows 7 - Ultramon vs. DisplayFusion – Scott Hanselman’s Computer Zen – Scott does a real-world comparison by a hard-core mulit-monitor user.  I’m running the mentioned 3.0.8 Ultramon beta on my dual-monitor desktop system at home and finding it very smooth and compatible with Windows 7.  Since I already own a license for it, it’s a no-brainer for me. However if I did want a freeware solution, DisplayFusion has much going for it.  As Scott shows, however, neither is perfect.

  • Celebrate the Arrival of 2010 with a New Windows 7 Theme! - Windows Experience Blog.

  • Desktop Wallpaper Calendar: January 2010 - Smashing Magazine.

  • win7utils - Windows 7 ISO Disc Image Utilities. From the developer’s page…   (as spotted via Lifehacker)

The Windows 7 ISO Image Edition Switcher is a set of small binary patches (and a tool to apply these patches) that will convert an official Windows 7 ISO disc image into an official Windows 7 ISO disc image of another edition. The resulting ISO images are bit-for-bit identical with those posted on MSDN or TechNet, and their SHA-1 hashes should match the official hashes posted by Microsoft.

The ei.cfg Removal Utility is a simple tool that will remove the ei.cfg from any Windows 7 ISO disc image, thereby converting the image into a "universal disc" that will prompt the user to select an edition during setup. This tool works by toggling the deletion bit in the UDF file table, eliminating the need for unpacking and rebuilding the ISO, which means that this is extremely fast (the process of patching the ISO to remove ei.cfg takes only a fraction of a second), and the process is easily reversible (running the utility on a disc image patched by this utility will restore the disc image to its original state).

Please note that these won’t allow your Windows Home Premium key to suddenly activate a Windows Ultimate install that you converted your install disk to offer…  Right key for right product version is still required….

  • Notepad2 Modifications - Kai Liu (developer of the W7 ISO disk image utility above, also offers a modded version of notepad2.  Not only that, he also has a tool that allows you to swap out the Microsoft Notepad with notepad2 automagically.  It can be done manually but is a royal pain.  This tool offers to make that process a lot easier.

  • Open Command Prompt Shell Extension – also offered by Kai Liu.  Like the Elevation PowerToys mentioned above, this autoconfig tool adds the ability to add the “open CMD here” and “open as Admin CMD here” to the right-click menu.  That reminded me of these native tricks as well; Windows 7 Trick: How to Open Command Prompt in Your Current Directory by a Single KeyStroke and Copy Path of a File to the Clipboard in Windows 7 or Vista.  The secret to get these to open on demand?  No, no “Alohomora” required.  Just hold down the “Shift” key when right-clicking and these options appear.

  • Microsoft prepares Windows 7 for external SP1 testing - Within Windows – Rafael Rivera uncovers evidence that Win7 systems are being seeded for qualification testing of the Win7 SP1 beta.  Per the post:

Similar to previous external beta service pack rollouts, Microsoft has enabled – via updates you already installed – a beta ‘candidacy check’ within its Windows Update software. Just like Windows Vista, a registry key and value pair need to be added prior to being authorized to download the new software.

Lots of coolness here.  Just be careful how you apply the power!

--Claus V.

Read More
Posted in anti-virus software, command-line interface, hacks, Link Fest, Microsoft, utilities, Vista, Vista mods, wallpapers, Windows 7 | No comments
Newer Posts Older Posts Home
Subscribe to: Posts (Atom)

Popular Posts

  • New Year’s Day - First Post 2011
    Same day I came out with my first post after a long drought, I fell upon this article Blogging Seems To Have Peaked, Says Pew Report over a...
  • Finally! Time to Post! New material list
    After a recent text from my bro reminding me it has been since March since I’ve done a blog post, I was finally able to clear the schedule a...
  • Oscar watch Linkpost
    Alvis and Lavie are watching the Oscars tonight and I’m along for the ride. I wasn’t able to come even close to getting out some of the pos...
  • Ubuntu 13.10 Upgrade - Lessons Learned & VIDMA utility found
    A few weeks ago a new release of Ubuntu came out. Naturally that meant it was update time! I have been getting pretty good at this now so ...
  • iodd : Multi-boot madness!
    Like many computer technicians and responders, I seem to always have at hand a collection of bootable media; CD’s, DVD’s, USB-HDD’s, flash m...
  • Network Capture Tools and Utilities
    At a conference this week, we had quite a section regarding network captures. The instructor was going on about how you can try to sort ou...
  • Mostly Minor Network Notes
    Here are some minor tweaks and features, mostly of a network nature. Manual Uninstall of the Cisco VPN Client « Mobile Expertise -- becaus...
  • It just has to be bigger on the inside…
      Last Christmas, Lavie gifted me with a cute little Jawbone JAMBOX unit. I thought it was pretty cool. It uses a Bluetooth connection t...
  • Windows Live Mail error 0x80041161
    Dad is working with his father-in-law who has an issue with his Suddenlink web-mail-based “forwarding” handling of messages. Seems that (an...
  • FireCAT 1.5 “Plus” Add-On Collection
    In yesterday’s GSD post I noted the following: Both of these tools brought be back to the excellent FireCAT 1.5 collection of Firefox...

Categories

  • Active Directory
  • anti-virus software
  • Apple
  • architecture
  • art
  • AVG
  • Blogger
  • blogging
  • books
  • boot-cd's
  • browsers
  • cars
  • cell-phones
  • cheat sheets
  • Chrome/Chromium
  • command-line interface
  • cooking
  • crafts
  • crazy
  • curmudgeon
  • DHC
  • Dr. Who
  • E-P1
  • Education
  • family
  • Firefox
  • firewalls
  • For the Gentleman
  • forensics
  • Gmail
  • Google
  • graphics
  • hacks
  • hardware
  • humor
  • hurricanes
  • imagex
  • Internet Explorer
  • iOS
  • iPhone
  • iPod
  • iTunes
  • Kindle
  • Learning
  • Link Fest
  • Linux
  • malware tools
  • Microsoft
  • movies
  • music
  • networking
  • NewsFox
  • NFAT
  • Nook
  • Opera
  • organization
  • PDF's
  • photography
  • politics
  • PowerShell
  • recipes
  • Remote Support
  • RSS
  • science
  • Scripting
  • search engines
  • security
  • Shuttle SFF
  • software
  • Texana
  • Thunderbird
  • troubleshooting
  • TrueCrypt
  • tutorials
  • utilities
  • VBscript
  • video
  • Virtual PC
  • virtualization
  • viruses
  • Vista
  • Vista mods
  • wallpapers
  • Win FE
  • Win PE
  • Win RE
  • Windows 7
  • Windows 8
  • Windows Home Server
  • Windows Live Writer
  • Windows Phone
  • writing
  • XP
  • XP mods
  • Xplico

Blog Archive

  • ▼  2013 (83)
    • ▼  November (8)
      • Ubuntu 13.10 Upgrade - Lessons Learned & VIDMA uti...
      • ForSec Linkfest - 2013 DST Fallback Edition
      • CryptoLocker Ransomware Info & Free Prevention Sol...
      • Linkfest for the SysAdmins
      • Microsoft Security Essentials/Defender & PowerShell
      • Miscellaneous TrueCrypt linkage
      • PowerShell 4.0 and a tiny “gotcha”
      • New Software Updates + VMware Tools Update fix
    • ►  October (8)
    • ►  September (14)
    • ►  August (6)
    • ►  July (10)
    • ►  June (10)
    • ►  April (11)
    • ►  March (6)
    • ►  February (7)
    • ►  January (3)
  • ►  2012 (96)
    • ►  December (8)
    • ►  November (4)
    • ►  October (9)
    • ►  September (8)
    • ►  August (12)
    • ►  July (4)
    • ►  June (3)
    • ►  May (7)
    • ►  April (13)
    • ►  March (3)
    • ►  February (5)
    • ►  January (20)
  • ►  2011 (41)
    • ►  December (8)
    • ►  November (7)
    • ►  September (4)
    • ►  August (4)
    • ►  July (2)
    • ►  June (6)
    • ►  March (5)
    • ►  February (1)
    • ►  January (4)
  • ►  2010 (69)
    • ►  December (1)
    • ►  October (3)
    • ►  September (2)
    • ►  August (13)
    • ►  July (17)
    • ►  June (3)
    • ►  May (3)
    • ►  April (3)
    • ►  March (11)
    • ►  February (1)
    • ►  January (12)
  • ►  2009 (177)
    • ►  December (20)
    • ►  November (11)
    • ►  October (7)
    • ►  September (7)
    • ►  August (21)
    • ►  July (17)
    • ►  June (7)
    • ►  May (18)
    • ►  April (9)
    • ►  March (17)
    • ►  February (23)
    • ►  January (20)
  • ►  2008 (35)
    • ►  December (23)
    • ►  November (12)
Powered by Blogger.

About Me

Unknown
View my complete profile