Bios Password

  • Subscribe to our RSS feed.
  • Twitter
  • StumbleUpon
  • Reddit
  • Facebook
  • Digg

Saturday, February 7, 2009

Custom Win PE Boot Disk Building: Step Four – Pulling it all together.

Posted on 12:20 PM by Unknown

Hang on. This may be a doozie.

It will (hopefully) wrap up this project.

Summary

The purpose of this ongoing project is to build a Win PE 2.0 based boot-disk, that has a great VistaPE GUI interface (instead of the standard CLI shell) and the PGP WDE drivers injected so we can “liveCD-boot” a PGP WDE system (assuming we have the user’s passphrase).  Oh yes, and it has to handle the Dell GX 7xx series USB keyboard drivers.

If you are just joining us, please go back and review the following posts to get up to speed:

  • Custom Win PE Boot Disk Building Saga: Introduction
  • Custom Win PE Boot Disk Building: Step One – WAIK up
  • Custom Win PE Boot Disk Building: Step Two – PGP Injection
  • Custom Win PE Boot Disk Building: Step Three – VistaPE 12 RC1 Walkthrough
  • Custom Win PE Boot Disk Building: Dead Ends Ahead!
  • Custom Win PE Boot Disk Building: Driver Dead Ends
  • Custom Win PE Boot Disk Building: Start me Up!

Note: I’m serious about this, if you haven’t read and stepped through the previous posts there is a good chance you will be lost.  Also, this post assumes you are familiar with working with Microsoft’s ImageX WIM files; mounting them, committing changes to them, etc.  If not then there is a good chance I will loose you here.

Mkay?

Onward!

When last we left our intrepid hero…

At the end of the last post, I was poking around in the VistaPE WAIK build WIM file and looking at how it worked.

I had started with the winpeshl.ini file that loads the VistaPE project’s shell replacement.

That was handled by the custom executable vpeldr.exe and it’s configuration file vistape.cfg.

Turns out that the VistaPE project developer, NightMan, has already provided us with all the documentation we need to understand just how that miracle functions:

  • VistaPE API – Internal functions of VistaPE – VistaPE project page

It’s a good read and I really encourage everyone to take the time to read and understand it. It really is an amazing piece of work from NightMan and he should be fairly recognized for it.

When I opened up my particular vistape.cfg file to review, I found it contained almost all the information I needed to trace out, extract, and then inject the “ripped” contents into my already PGP Injected Win PE 2.0 wim.

Sweet.

WIM Mounting

I’m sure if you are still reading this post, you have already configured your system to allow for the mounting of ImageX wim files.  If not, please take a moment to read this earlier post:

  • Mount ImageX WIM’s via Windows Explorer – Grand Stream Dreams blog

Yes, you can use ImageX to mount your wim files via the CLI, but with all the work we have done and have yet to do, it seems much more efficient for me to work with them from a GUI interface.

For the longest time I preferred the method of adding this quick-mount feature to the Windows right-click shell context: Mounting WIM Images from Windows Explorer - Robert McLaws: Windows Vista Edition

However, I would occasionally get lost with my mount/unmount points and wims in progress and would trip myself up.

Then I graduated up to the ImageX GUI (GImageX) coded by Jonathan Bennett.

The latest version is v2.0.14 released in October 2008 and it is sharp.  He actually now has a beta version that supports the upgraded version of ImageX found in the Windows 7 Beta WAIK.

So either way, be prepared.  I’m using the GImageX to do my work here.

Bonus Tip:  I’m also using the freeware dual-pane/tabbed window explorer alternative FreeCommander not just because I love it but the dual-pane window makes file-copy actions like what we are about to do so much easier than Windows Explorer.  There are a lot of other great alternative file managers as well you might want to look into trying.  Your call…

Organ Harvesting

I created an empty folder at the root of C: called “mounted_wim” to use as my mounting point for wim files.  That was a carryover from my foray into using Robert McLaw’s mounting solution.  I’ve kept with it.

I also created another empty folder at the root of C: called “extracted_items”.  This is where I am going to temporarily place the files/folders I pull out of the VistaPE WAIK project that I need.  You might want to go ahead and make a “system32” folder in there as well while you are at it.

Using whatever your preferred method of wim mounting is, go ahead and mount up the VistaPE wim you created in our Custom Win PE Boot Disk Building: Step Three – VistaPE 12 RC1 Walkthrough step.

If you followed those steps, you should find it in the following location:

C:\VistaPE_WinBuilder_v12RC1\Target\VistaPE-Core\vistape.wim

OK?

Browse to the location you mounted it and copy the following items into your “extracted_items” folder.

Depending on how you roll, you might want to make some notes on a scratch-pad of where stuff came from so you can put it back correctly.

From the VistaPE.wim file we want to copy:

  • “Program Files” <—the folder and all its sub-contents.  Note I just copy this folder as is into the extracted_items folder.

Now browse deeper into the windows\system32 folder and locate and copy the following items into your “C:\extracted_items\system32” folder:

  • devcon.exe
  • hw.bat
  • HWPnp.exe
  • HWPnP.htm
  • HWPnPDLL.dll
  • vistape.cfg
  • vpeldr.exe
  • winpe.bmp
  • winpeshl.ini

Want to explore this particular WIM a moment since we are here?  Fine.  Just don’t take any more relics this time round.

All done?

Unmount your vistape.wim file from your system.

Stage 1: Transplant the Brains

Now go and this time mount up our previously PGP WDE driver injected Win PE 2.0 WIM file.

C:\winpe_x86\ISO\sources\boot.wim

This time, be sure to mount it “Read and Write” so we can actually make changes to it.  (Note: you might want to make a copy of the working original first, just in case you make a mistake!)

Into the C:\mounted_wim\Program Files folder, let’s copy back the sub-folder contents from our C:\extracted_items\Program Files location.

Got em all tucked in?  Great!

Now browse to your C:\extracted_items\system32 and copy all those items into the C:\mounted_wim\Windows\System32 folder.

You are doing great!

Tweak the HWPnP module

Now, in previously looking at the vistape.cfg file, I located that it called to a HWPnP.exe file that uses the hw.bat file to supplement it.  Research on that file indicates it is a Plug-n-Play helper used in BartPE and VistaPE projects.

The VistaPE WAIK build shows the second line the hw.bat file acts off of is as follows:

HWPnP.exe +all -storage\volume -USB\ROOT_HUB +USB\ /log /p /u /d+ /a

Since I knew the Dell USB keyboard hub controller driver was giving me fits, I decided to err on the side of caution and disable this.  This may not actually be needed.  It’s up to you.

Open up the hw.bat file and add two colons in front of it to REM it out thusly

::HWPnP.exe +all -storage\volume -USB\ROOT_HUB +USB\ /log /p /u /d+ /a

Save the modified file back.

Dismount that wim and be sure to use the option to “commit changes” so our changes actually get written and applied to the winpe.wim file.  This part might take a while to process as the changes are written and the wim file is updated.

Stage 2: Transplant the Lungs

Now, we know from our l33t Win PE 2.0 hacking skillz that any files/folders we add into the C:\winpe_x86\ISO folder will be included on the root of our final boot disk.  Right?

So lets work on that next.

Browse back to 

C:\VistaPE_WinBuilder_v12RC1\Target\VistaPE-Core

In there, copy the following items:

  • “Programs” <—the folder and all its sub-contents.
  • vistape.cfg

And paste them into the following folder.

C:\winpe_x86\ISO

I always be sure I have a copy of the ImageX.exe file copied in there as well.  That’s up to you.  It makes system imaging and capture so easy.

You can add in other things as well to that folder (once you figure out how much extra space you have) such as portable system utilities and other stuff. Just don’t add anything that modifies or overwrites the things we have already added in there.  I prefer to make another subfolder called “utilities” and dump all my special stuff in there just to be safe.

Stage 3-option 1: Sewing it Up (for standard CD disk media)

Go to the Start menu and under All Programs find the Microsoft Windows AIK folder and launch Windows PE Tools Command Prompt, or open a command prompt and type

cd c:\program files\Windows AIK\Tools\PETools.

Then, type

oscdimg -n -bc:\winpe_x86\etfsboot.com c:\winpe_x86\ISO c:\winpe_x86\winpe_x86.iso

(all one line)

An ISO file will be created inside the c:\winpe_86 folder.

With the ISO image file created, you can now burn the image file to CD.

Stage 3-option 2: Sewing it Up (for standard DVD disk media)

I personally stick with the CD sized builds as almost every system we touch (old and new) comes with a CD-ROM drive.  Newer systems have DVD-ROM drives, but if I go to service an older system the DVD disk isn’t going to help me.

If you try to burn a DVD sized ISO with the normal instructions above it will error out.  You must use the undocumented "-m" argument in your string to force it to build the ISO over the normal CD-sized ISO size.  Use the -m switch to override the creation of ISO images larger than 700 MB

In that case (because you got all crazy with adding lots of extra custom utilities and stuff into your C:\winpe_x86\ISO folder) type

oscdimg -n -h -m -bc:\winpe_x86\etfsboot.com c:\winpe_x86\ISO c:\winpe_x86\winpe_x86.iso

(again, all one line).

With the image file created, you can now burn it to a DVD disk. (assuming that the combined file-size isn't larger than the DVD's storage capacity.)

Testing

I ALWAYS pre-test my built boot ISO files in a Virtual PC 2007 session first before burning.  That way if I did something wrong I will see it before making coasters.

If all goes well you should see the following (click for a slightly larger view and yes, I know the wallpaper may be a bit different on yours…read on for how to customize that).  Note the PGP drivers are working (even though the virtual drive I am using isn’t actually PGP WDE encrypted…).

image

If it looks good and seems to work cleanly, burn your custom “Win PE 2.0 + PGP WDE driver injected + VistaPE WAIK build ripped + Dell Optiplex USB keyboard driver working” Frankenstein’ish ISO (located as C:\winpe_x86\winpe_x86.iso) to a disk and see what happens on your live systems!

Caveats

Ripping out the core elements of Vista PE WAIK build as I have documented works.  But it might make NightMan and other hard-core VistaPE/WinBuilder pro’s groan.  I’m also likely leaving some critical bits behind.

So there are some applications that would work fine in traditional VistaPE build that error out and will not run under this GSD project.  Be aware of that.

Second, if you go back in and mount the “C:\winpe_x86\ISO\sources\boot.wim” file, make more changes (wallpaper below for example) and re-commit the changes, you will likely notice your boot.wim file size continues to grow.   This is not just because you added stuff, even if you “delete” stuff from your mounted/committed wim, it may still grow.  That’s because with this method of wim management the changes haven’t been optimized to the wim.  You need to actually export your wim file in a different ImageX process to reclaim the space when you have modified it.  See this post (and the Google) for more information on that.  I normally don’t bother as my final ISO size is still under the limits for a CD burn.

Also, if you compare the vistape.wim used to boot a standard VistaPE WAIK project to the one we did using a (PGP modified) base Win PE 2.0 boot wim you will see close to the following:

  • C:\VistaPE_WinBuilder_v12RC1\Target\VistaPE-Core\vistape.wim  Size = 102.86 MB
  • C:\winpe_x86\ISO\sources\boot.wim Size = 187.11 MB

NightMan and all have worked hard on the original VistaPE WinBuilder project to remove many files/folders and other items from the standard Win PE 2.0 WAIK wim file that are not necessary or needed to work in his project.  That’s why the size is so much smaller.

But in doing so, something caused the Dell Optiplex 7xx “USB Keyboard Hub” and related HID drivers from loading.

This method works around that.

I haven’t tested it on other systems, just those that I and my team service and support.  It might work just fine on other hardware system configurations with that same issue.  It might not.  I don’t know. 

If you take the time to do all this and find it does help you load previously unavailable USB keyboard devices on your own particular system, please leave a note in the comments so others (and myself) will learn of your success.

As always, what works for me and our systems, may not for you.  Your mileage may vary.

Also, I’ve got at least one more related post in this series planned to address coming developments I have found with future VistaPE/WinBuilder projects as well as Win PE 3.0 in general.

So stay tuned for that.

Optional Tweaks and Tips

As I mentioned before, if you want to kick things up a notch, add in some additional portable applications, and fire them up off via PStart you can add a modified version of this to your startnet.cmd file before you pack up your customized wim: (via RunOnceEx from CD by Alanoll)

wpeinit

cmd.exe

For %%i IN (D E F G H I J K) DO IF EXIST %%i:\cd-specific_filename SET CDROM=%%i:

%CDROM%\PSTART\PSTART.EXE

Also, if you want to add a sexy custom desktop wallpaper (please comply with any work-rules if you distribute such builds in your workplace and use something tamer) just find your image (I prefer to use 1024x786 sized), and convert it to a BMP format file and save with the name “winpe.bmp” and place back in your custom wim’s windows\system32 folder overwriting the original one we extracted from the VistaPE WAIK built wim.

I have also discovered that if you want to plug in a USB storage device to your Win PE booted system it doesn’t always pick up the new drive.

Open a cmd session and run the command “DiskPart” then do a “list disk”,

That is usually sufficient for the OS to scan for any drives and mount what it detects.

Refresh your windows explorer tool (in this build it would be Cubic Explorer) and you should see it now just fine.

Tomb Raiding using the PGP WDE drivers and pgpwde.exe

Remember, one of the other reasons I needed to go through all this pain and learning was to be able to boot one of our PGP WDE encrypted systems “off-line” with a VistaPE’ish Win PE boot disk and use the PGP injected drivers to access the “on-the-fly” decrypted contents of the drive rather than taking hours (or more) to do a full off-line drive decryption using the stock PGP WDE recovery boot-disk (and see this PGP link on how to use), before being able to access the contents with a traditional boot-cd.

Our hard work and dedication has now given us a much more flexible and powerful tool!

Boot the PGP WDE system with our custom boot disk.

Of course, you will need to know the user’s PGP WDE passphrase for on-the-fly file/system access and recovery to work….

Open up a CMD session.

The basic commands I use are as follows

  • pgpwde –enum
  • pgpwde --disk 0 –status
  • pgpwde --disk 0 --auth -p “xxxx”   (NOTE: put passphrase in “  “ if separated with spaces.)
  • pgpwde -h

The first one “enumerates” the system disks and volumes.

The second one shows the status of any pending WDE encryption/decryption activities.  This might tell you if WDE was initialized and is x% completed.

The third command is the money-shot.  This is what our tomb-raiding has been working towards. It allows you (with the user’s PGP WDE passphase) to decrypt the drives “on-the-fly” from the Win PE 2.0 environment so you can recover the files from a non-bootable system if the OS has crashed (or for other reasons).  The trick to this one is that if the user’s PGP WDE passphrase has spaces in it, you must enclose it all in quotations marks.

I haven’t tested to see if this will take a PGP WDE recovery token and if so, what impact that might have.  In our cases (so far) the user is present and can provide us with their passphrase.  If they have disappeared and their passphrase is not available, then you would need to try a PGP WDE recovery token instead.  I’ll let you know if I try it and it works.

There are many, many more powerful PGP commands and arguments for the pgpwde.exe executable. Do the fourth command to list them all.  Then search the Google for some powerful and undocumented ones as well.

Either on a live PGP booted system or a LiveCD PGP injected system, the pgpwde.exe command line tools are very good to know and be familiar with if you support such systems.

Final Warning: You must inject and use the PGP WDE drivers/tools specific to the version of PGP WDE deployed on your system(s).  Failure to do so might seriously muck things up!  Mkay?

Whew!

Thanks for sticking with me.  I hope this helps someone (or two).

I also suppose if you had the VistaPE USB system keyboard sensing issue but didn’t need the PGP WDE drivers, you could just skip over that step and not do that.  The rest should work fine.

Wicked Cool and Sexy, isn’t it?

Just like I promised….

Cheers!

--Claus V.

Read More
Posted in command-line interface, hacks, security, troubleshooting, tutorials, utilities, Win PE | No comments

Custom Win PE Boot Disk Building: Start me Up!

Posted on 8:54 AM by Unknown

With deference to The Stones…

This is the second part of failure related to getting my custom Win PE 2.0 boot disk finally up and running.  It actually provided the material needed to make my Eureka moment.

Summary

The purpose of this ongoing project is to build a Win PE 2.0 based boot-disk, that has a great VistaPE GUI interface (instead of the standard CLI shell) and the PGP WDE drivers injected so we can “liveCD-boot” a PGP WDE system (assuming we have the user’s passphrase).  Oh yes, and it has to handle the Dell GX 7xx series USB keyboard drivers.

If you are just joining us, please go back and review the following posts to get up to speed:

  • Custom Win PE Boot Disk Building Saga: Introduction
  • Custom Win PE Boot Disk Building: Step One – WAIK up
  • Custom Win PE Boot Disk Building: Step Two – PGP Injection
  • Custom Win PE Boot Disk Building: Step Three – VistaPE 12 RC1 Walkthrough
  • Custom Win PE Boot Disk Building: Dead Ends Ahead!
  • Custom Win PE Boot Disk Building: Driver Dead Ends

OK. Now on to the second failure.

Run it Baby!

As frequent readers of the GSD blog may have identified.  I have a love of both Windows utilities and portable applications.

I have long-ago superseded the space a common CD-ROM offers for holding all the portable tools and utilities I have collected and use.  As it currently holds, my home “standalone apps” folder contains 2.5 GB worth of programs that work just fine off a USB drive.  The majority of those work fine off a CD/DVD-ROM disk, and a significant portion will also run without fail in the WinPE/VistaPE LiveCD environment.

I also build a custom version to hand out to our technicians at work.  It has the LiveCD system boot side of things (PE 2.0) and if you put it in a running Windows system, it kicks off an auto-play feature that launches PStart with links and all kinds of structured goodness to the portable utilities I have placed on it.  The techies love it.

Some day I will have to take a week off from work and update my Portable SysAdmin Tools post with the current holdings that it represents.

So since I had been failing miserably at getting my sexy VistaPE boot Cd working (with PGP WDE drivers) and the stupid Dell USB hub drivers/keyboard, I felt I had only one avenue left; to just go back to the stripped down WinPE 2.0 CLI base build, inject PGP WDE drivers as we have seen how to do, and tell the guys and gals to be grateful for it.

Rationalizations

However, after a lunch break that day, I took off my analyst hat and put on my techie beanie to think about this from a different perspective.

The VistaPE interface delivers a wicked-naughty GUI interface for the Win PE 2.0 OS environment, and it delivers a cornucopia of custom tools, utilities, system hax0r helps, and other things that make a sysadmin flush.  I use the majority of these included tools and then many of the portable ones I bundle along on the CD for the ride.

However it is my observation that our techies generally only use it boot a system “off-line”, recover user data from it to a USB drive, and then move on to reimage the system and restore the user’s data.  The only tool they really interface with is a “windows explorer” clone (A43 or CubicExplorer).  With the exception of CLI work with ImageX and DiskPart, that’s really it.

So, maybe….just maybe…I could hack out a way to get the PStart launcher on the “Live” side of the disk feature to kick off once the WinPE 2.0 system initializes and then they could just pick the apps they want to work with.

Yes, it’s like dropping Angelina Jolie as Lara Croft for a pale substitute, but it could be serviceable if done right.

Now how can I do that?

The Registry?

I already knew I could hack the registry of a mounted WIM file, make changes and repack.

  • Windows Registry Tricks and some Processing Treats – Grand Stream Dreams blog

Maybe I could add a key for an auto-start group to kick off the PStart executable?

Long story short, this technique might work…but there are some barriers.  Aside from the technical ones with the way the Win PE handles startup items (we are getting there), the bigger issue is how do I ensure that the Win PE system is always going to find the correct CD ROM drive letter I’m running on?  I mean, some systems might have multiple drives/partitions and I have no guarantee I’m always going to end up running with the CD/DVD drive as the D:.

Nope.  This Registry launching pad ended up being a dead-end.

Off to the Googles

Now, I have always said up-front to my dear readers that I have not ever had any formal training in Windows systems administration, Microsoft Certifications, or other things that would be deeply useful and beneficial in my job assignment.  Nope.  It all due to years of collegiate honing of my brain, growing up with an ex-army officer dad, and an inordinate curiosity about trying to figure out how things work, and remembering (generally) everything I encounter technically.

So I did some searching on the Net and l pulled up a very important bit of info that all Win PE students should probably be familiar with.  From that TechNet article:

Windows PE provides three methods for launching custom scripts: Winpeshl.ini, Startnet.cmd, and Unattend.xml. The Windows PE default interface is a Command Prompt window. However, you can create a customized Winpeshl.ini file to run your own shell application. You can also create your own version of Startnet.cmd to run a specific set of commands, batch files, or scripts. Unattend.xml is a new answer file format for Windows PE 2.0, which replaces Winbom.ini and Winpeoem.sif.

I’m an Idiot

You mean all I have to do to kick off something “custom” from a Win PE startup is either modify an .ini file or write a custom batch-script and save it in the right location/name?

For more than a few hours I felt like this:

image

(I’m An Idiot – xkcd.com)

After a while of fiddling with and boning up on both the Winpeshl.ini and the Startnet.cmd methods, I ended up concentrating on the startnet.cmd vector.

If you mount a base Win PE 2.0 WAIK wim and take a look in the startnet.cmd file (to be found at the %SYSTEMROOT%\System32 location), you will see it contains a single line:

wpeinit

That’s it.  This ensures plug-n-play/networking support. 

Wpeinit is a command-line tool that initializes Windows PE each time it boots. When Windows PE starts, Winpeshl.exe executes Startnet.cmd, which launches Wpeinit.exe. Wpeinit.exe specifically installs PnP devices, processes Unattend.xml settings, and loads network resources.

I wanted to custom launch PStart, and needed a way to identify which drive letter I was running from in my batch-process so I could call to the correct location to execute PStart.

I found this great tip:

RunOnceEx from CD – by Alanoll at Unattended Windows site

After much coding, wim mounting, changing files, saving wim changes and Virtual PC session testing of the modified WIM I arrived at a realization.

This method works, you can get it work, but it is pretty clunky and once you have seen Angelina Jolie as Lara Croft, substitutes just don’t satisfy.  Sorry.

I searched through various forums and found many great and custom examples of both startnet.cmd and winpeshl.ini files and the more I read, the more I understood.

Wait for it….

Maybe I needed to reconsider my choice of focus on startnet.cmd and use an alternative Windows shell loading under the winpeshl.ini instead.

VistaPE uses BS Explorer. Maybe I could make up my own WInPE 2.0 using that custom one.

There are a number of others to check out if alternative Windows shell replacements are your thing. Most are freeware/OpenSource/shareware products. Some are commercial ($).  I am familiar with many of them, but have not tested any of them for compatibility and support in the Win PE environment.

  • Aston Shell
  • BB4Win (BlackBox for Windows)
  • BBLean website
  • Bluebox Win32 alternate shell
  • Emerge Desktop
  • Hover Desk
  • LiteStep
  • Secure Desktop 7
  • SharpEnviro
  • Talisman Desktop 3.0

As I was working this avenue out I decided to load up the resulting VistaPE WAIK build WIM file to take a look at what was going on there.  Maybe I could get some more pointers.

So I mounted the vistape.wim file I had previously created and took a look starting with the critical files I had learned were valid Win PE 2.0 launching points.

By this time I was fairly comfortable looking for and interpreting the structure of these particular files, and I surmised that VistaPE must be using something similar.

It was.

[LaunchApps]
vpeldr.exe
"x:\Program Files\BSExplorer\Explorer.exe"
cmd.exe, /k

This seemed too simple.  I then investigated the vpeldr.exe (VistaPELoadeR perhaps). Next to it was a vistape.cfg (configuration) file.  I opened that up to take a look and…

Eureka!

Instead of re-inventing the wheel, what would happen if I extracted the core elements I needed out of a compiled VistaPE project and “injected” it in the Win PE 2.0 build WIM that was already meeting three of my four critical custom Win PE 2.0 needs?

  1. Win PE base to boot a Windows system off line. (check)
  2. Injected PGP WDE driver compatibility. (check)
  3. Loads Dell Optiplex 7xx USB keyboard drivers natively. (check)
  4. Sexy VistaPE shell GUI. (still missing)

The solution to #4?

Next post.

--Claus V.

Read More
Posted in command-line interface, tutorials, utilities, Win PE | No comments

Sunday, February 1, 2009

Custom Win PE Boot Disk Building: Driver Dead Ends

Posted on 2:13 PM by Unknown

Finally, back to looking at the VistaPE/WinPE building dead-ends I mentioned my post Custom Win PE Boot Disk Building: Dead Ends Ahead!

Summary

The purpose of this ongoing project is to build a Win PE 2.0 based boot-disk, that has a great VistaPE GUI interface (instead of the standard CLI shell) and the PGP WDE drivers injected so we can “liveCD-boot” a PGP WDE system (assuming we have the user’s passphrase).  Oh yes, and it has to handle the Dell GX 7xx series USB keyboard drivers.

If you are just joining us, please go back and review the following posts to get up to speed:

  • Custom Win PE Boot Disk Building Saga: Introduction
  • Custom Win PE Boot Disk Building: Step One – WAIK up
  • Custom Win PE Boot Disk Building: Step Two – PGP Injection
  • Custom Win PE Boot Disk Building: Step Three – VistaPE 12 RC1 Walkthrough

OK. Now on to the failure.

Breaking down the Breakdowns

I knew that a Win PE 2.0 boot disk worked fine with loading the Dell Optiplex 7xx series USB keyboard driver.  Typing with the keyboard worked great.

But building a stock VistaPE version with the WAIK failed to load the USB keyboard properly (at all).

Building a stock VistaPE version with a Vista setup disk succeeded in loading the USB keyboard.

So it seemed the solution was to either use a WinPE 2.0 disk (blah) or the VistaPE Vista setup disk and skip the WAIK version.

That would have been fine, but, since I had added in a new factor (PGP WDE driver injection) I had a new issue

The PGP WDE injected WinPE 2.0 still worked great (blah).

The PGP WDE injected VistaPE based on the WAIK worked perfectly…except for the fact the USB keyboard did not.

The PGP WDE injected VistaPE based on the Vista setup DVD BSOD’ed.

I didn’t want to use the WinPE 2.0 version only because I’m stubborn, have spoiled our team with the sexy VistaPE GUI versions I have previously released, and very few are comfortable in CLI mode.

The following things seemed clear to me:

  1. The drivers I needed were present and working in WinPE 2.0 as the keyboard worked fine there.
  2. The drivers I needed were either removed or not loading in the VistaPE WAIK build, and
  3. The drivers I needed were included or loaded in the VistaPE Vista setup DVD build as it included advanced hardware sensing the WAIK build version lacks, but then the additional drivers conflicted fatally with the PGP WDE drivers.

Research Time

I figured if I could compare the drivers loaded in the working WinPE 2.0 version against those loaded in the VistaPE WAIK version, I might be able to find what was missing.

So, I had to get the data on what was loading.

How to do that on a bootCD?

Easy.

I downloaded and unpacked DriverView which is a free utility from Nir Sofer and placed it on a USB stick.  DriverView enumerates and provides details on all the drivers loaded by a Windows system.

I then booted the system under both WinPE 2.0 and VistaPE WAIK, captured the loaded driver data, then exported the findings as a file back to the USB stick.

Since the mouse device at least worked, I was in pretty good shape.

I then used my primary system to print out the reports and then compared them side by side.

When done I located a number of drivers that did not load in the VistaPE WAIK build that were present in the WinPE 2.0.

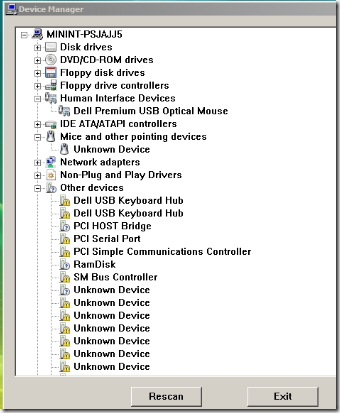
Curiously, most seemed to relate to USB and HID (human interface device) drivers.  Specifically a Dell USB Keyboard Hub driver.

That jived with what I saw under the Device Manager as well.

(not working below)

image

(working below)

image

That made sense. The keyboard didn’t work because the system wasn’t loading the USB hub device it was first, then the keyboard controller tied to that USB hub. 

I thought about it and figured if I could get the Dell Intel chipset drivers and unpack them, then inject them, that might be best.

I found the proper Intel Chipset drivers for the Dell system.  (Dell link source here.) Turns out they have a self-checking feature to ensure they unpack only on a Vista system.  Since my systems were XP OS only, it was a problem for a minute, until I tossed a VirtualPC install on a Dell system, then tossed a virtual Vista system on that, and then finally ran the package.  It unpacked nicely.  Clever that way I am.

The D-Man knew I had been banging my head on the desk on this issue for a few days and  mercifully suggested a great free utility called Double Driver.  I found it easy to use and USB portable so I used it on the working WinPE 2.0 boot disk to snag the loaded (and USB Keyboard Hub) drivers as well, neat and clean.  I could have used Driver Backup! as well to snag ‘em.  Both do a great job of pulling all the required driver files and packing them neat and tidy in their own sub-folders. I saved (backed up) the files back to the USB stick I was running Double Driver from.

Now, how to get them added into the VistaPE build?

(Note: I know all about injecting drivers into wim files, but since I wasn’t focusing on the WinPE 2.0 build but the VistaPE build, I wanted a process specific to that tool if possible.)

Adding Extra Drivers to VistaPE builds

In most all cases, VistaPE with both WAIK and Vista setup source builds should work just fine.  However from time to time one needs special drivers to make things work perfectly.

I found a solution from “MudCrab” that was easy and perfect.

  • Adding Drivers for Unsupported Hardware – The Mud Crab

You will need the great VistaPE script: Mustang's VistaPE AddDrivers Script

Follow MudCrab’s wonderful guide and you should be going great.  Just pay very close attention and DON’T PUT ANY SPACES IN THE FOLDER NAMES OR FILES OR PATHS!  That’s kinda important.

Now in my case, I had narrowed down about eighteen (18) drivers from my research that I wanted to add into the VistaPE building process.

Mustang’s script only handled up to five.

So on a hunch I just took his original “AddDrivers.script” file, copied it three more times times, and then renamed each one with an extra number: “AddDrivers2.script”, “AddDrivers3.script”, and “AddDrivers4.script”. I hit the VistaPE refresh button and there they all were!

Now I could add up to twenty drivers. Keep going as your needs are.

I selected all the drivers I needed from my extractions, added them in, then re-ran the VistaPE WinBuilder project to build the VistaPE WAIK version.  The scripts worked perfectly and I saw all the my additional drivers getting added in.

Success?

Nope.

Sigh.

When I went to try the disk, it still did not load the right drivers for the Dell USB Keyboard Hub.

I was able to mount the new .wim file that the build used, and confirmed that the new drivers had all been added successfully.

Unfortunately, something about the way things were modified in VistaPE changed the way the WinPE 2.0 system loaded the drivers, and it was just not installing the one I wanted, even though it was now embedded there and accessible for use.

Dead End #1 Achieved

However, even though this didn’t solve my problem, the poking around in the resulting .wim file used by WinPE/VistaPE did bring me a bit closer to my eventual working solution.

And I worked out a way to add as many additional drivers as I might need in the future to VistaPE constructions.

So even though I was disappointed, I learned a clever way to snag drivers from a working system and how to port them into VistaPE Winbuilder projects.

I also learned about Mustang’s great DriverAdd script and how to multiply it.

Finally, I decided that I needed to move on from VistaPE and see if I could then somehow modify the WinPE 2.0 disk to contain some GUI enhancements that would make it useful for both the PGP WDE drivers that worked, the Dell Keyboard USB HUB driver handling that worked, and get away from the CLI underpinnings that turned off that turned off our technicians from using the pure WinPE 2.0 disk format.

That adventure led to Dead End #2….but provided me enough information to have my Eureka breakthrough.

Hang on!  It’s getting exciting!

--Claus V.

Read More
Posted in boot-cd's, hacks, troubleshooting, tutorials, utilities, Vista, Vista mods, Win PE | No comments

Windows micro Linkfest

Posted on 12:53 PM by Unknown

One more post to clean out the hopper.

  • Solving a baffling Vista setup error - Ed Bott’s Windows Expertise – Why does installing three features during setup cause a failure, but installing them after disabling them work? We don’t know, but it does.
  • Microsoft delivers new Vista SP2 test build - All about Microsoft blog. No firm date yet but likely to be before a Windows 7 final release. SP2 includes a number of fixes and updates.
  • Electronista | MS faces antitrust conflict over Vista marketing – Electronista – Gist is that the DOJ is looking at complaints that MS has favored OEMs that market “optimized” systems that perform better under Vista than others that do not.  Speculation is that by doing so MS could be trying to negate the negative consumer buzz about Vista performance issues.  I don’t know but I do see that the number of OEM systems with 2-4GB system RAM deployments by default are more common-place…and it is my personal experience that they run Vista amazingly better than with just 1GB or less.  I’m just saying…
  • Howto disable the Internet Explorer popup: This page contains both secure and non-secure items. Do you want to display the nonsecure items? - the back room tech – Simple tip from Julie to deal this this annoyance security alert feature.
  • Howto: Disable the clicking sound in Internet Explorer and Windows Explorer - the back room tech – I didn’t even realize that it was happening until I read this tip.  Julie does us all a favor by reducing this particular IE annoyance.
  • Dell and Broadcom fixes BCM42RLY issue on Dell Wireless WLAN 1505/Vista – Donna’s SecurityFlash – Rejoice Dell systems wireless users!  A new driver release for Vista addresses numerous headaches!  Read carefully before adopting, but if you have been having issues, this might be the ticket.

Cheers!

--Claus V.

Read More
Posted in Internet Explorer, Link Fest, Microsoft, troubleshooting, Vista | No comments

Internet Explorer 8 RC released: What to expect and a whole lot more…

Posted on 12:25 PM by Unknown

Yep.  Almost (but not quite) left forgotten by the celebration of Microsoft’s Windows 7 Beta release has been the announcement that Internet Explorer 8 Release Candidate is now available.

  • Internet Explorer 8 Release Candidate Now Available – IEBlog

What’s New

The team will post more about all changes between Beta 2 and RC. In brief:

  • Platform Complete. The technical community should expect the final IE8 release to behave as the Release Candidate does. The IE8 product is effectively complete and done. We’ll post separately about the thousands of additional test cases we’re contributing to the W3C. We've listened very carefully to feedback from the betas. With the Release Candidate, we’re listening carefully for critical issues.
  • Reliability, Performance, and Compatibility improvements. We’ve studied the telemetry feedback about the browser's underlying quality and addressed many issues.
  • Security. We’ve worked closely with people in the security community to enable consumer-ready clickjacking protection. Sites can now protect themselves and their users from clickjacking attacks “out of the box,” without impacting compatibility or requiring browser add-ons.  We also made some changes to InPrivate based on feedback from customers and partners.

We also made some changes to the user experience based on feedback. For example, based on data about how people use actually it, we made fitting more items on the Favorites bar easier. (Note that the IE8 Release Candidate is for Windows Vista, XP, and Server only; Windows 7 users will get an updated IE8 with the next update of Windows 7. Also, the Release Candidate of the Internet Explorer Administration Kit is available for download now.)

I’ve been using the Beta release for a while in a virtual system and it has performed well.  Next I will need to bump it up to the RC version.

Preliminaries

It doesn’t appear to be as big a deal but you better still read the fine print before embarking.

  • Upgrading to Internet Explorer 8 Release Candidate 1 – IEBlog

This post has a bunch of goodies for the intrepid installers.

Let’s rip out the critical bits from that post.

  • If you are on Vista and already have an IE8 Beta version, then this will upgrade in place. No uninstall of the previous version will be needed.
  • There is a new pre-requisite for IE8 RC1 (KB957388). Be on the lookout for it.
  • Windows 7 Beta users already are running a special build of IE8 already. Don’t try to install it on that platform.
  • Release notes for RC1 outline a few scenarios you should watch out for when installing IE8 RC1.
  • Technet Edge interview [the post author] did covers many install topics

XP users (most)

Download the installer file. (Unless you already have a IE8 pre-RC version installed in which case you might be offered it via Automatic Updates or Windows Update.)

Be prepared that the IE8 RC installer will first uninstall (if previously installed) IE8 pre-RC versions from your system.  Then it will reboot, complete the IE8 RC install, then reboot again.

Check the version by going to Help –> About Internet Explorer dialog to see the version number 8.0.6001.18372.

Go and hit your Windows Updates to find the particular update required when running IE8 RC1 on multi-core XP-SP2 x86 computers: KB932823 or KB946501

XP SP3 users (a chosen few): Red pill or Blue pill?

If you happened to first install IE8 pre-RC versions before upgrading to XP-SP3 you’ve got some hard choices to make.  If your option to uninstall the IE8 pre-RC version is “grayed” out, then you can continue to install IE8 RC (and future release versions including the final version) but you will no longer be able to uninstall either IE8 or XP SP3 from here on out.  You will get a nice warning dialog before you proceed. Do so and both your IE8 and XP SP3 tattoos stick permanently.

If this concerns you, then you need to uninstall the XP SP3 service pack, then uninstall your IE8 Beta version, reinstall XP SP3, then go forward to installing IE8 RC.

It’s up to you. Choose wisely.

Vista Users have it Easiest

IE designers, based on user feedback, built IE8 installer to automatically replace IE8 pre-RC builds as part of the RC installation process.  This makes things very simple.

Run the installer (or via the Windows Update process if a previous IE8 Beta version is present), let it do its thing, reboot, done.  You do need to first get KB937287 and KB957388.

After IE8 RC1 installation is wrapped up the final screen of the Install Wizard should tell you that IE8 finished cleanly.

To verify, launch IE, open Help –> About Internet Explorer and find the version number 8.0.6001.18372.

Dwight Silverman has a illustrated guide to the process for Vista at TechBlog: Installing Internet Explorer 8 RC1: A visual tour

Other IE8 Bits

Here is some more IE8 reading on features

IEBlog : IE8 Security Part VII: ClickJacking Defenses – It’s a bit dense with web-code architecture and how it relates to browser design but this seems to be the point IE designers want us to know:

As we designed Internet Explorer 8, we had to be very careful not to increase the browser’s attack surface for CSRF attacks. IE8’s new XDomainRequest object, for instance, allows cross-domain communication upon explicit permission of the server, but contains specific restrictions to ensure that new types of CSRF attacks are not made possible. End-users can mitigate the impact of CSRF attacks by logging out of sensitive websites when not in use, and by browsing in independent InPrivate Browsing sessions. (InPrivate sessions start with an empty cookie jar, so cached cookies cannot be replayed in CSRF attacks.)

Security’s Crux: Real Problems vs Point Solutions – Digital Soapbox blog Rafal Los provides a  very interesting counterpoint to this approach.  He steps back and takes a wider view and analysis of the clickjacking threat.

I keep reading Giorgio's posts on the Internet Explorer 8 BETA1 release and "ClickJacking" protections offered therein (here and here), yes he's the guy who does NoScript, and it's all of the sudden become clear to me. Once again, Microsoft has solved an industry-wide problem by perpetuating their own proprietary technologies and then marketing them as ground-breaking. NoScript addresses the UI Redress attack (more commonly known as ClickJacking), but since IE is so proprietary and closed... they have to re-invent the wheel to self-serve. This perpetuates the need for Microsoft to "save the masses"... since most people that don't know better are hooked on Microsoft's IE technology like crack.

I quickly got lost on Giorgio’s own blog site following those links.  Again, unless you are a security wonk or web-design guru you might get lost, but I still found them very fascinating to read. Especially as they touch on an important topic for browser security.

  • Ehy IE8, I Can Has Some Clickjacking Protection? – Giorgio Maone’s hackademix blog
  • IE8’s “Clickjacking Protection” Exposed – Giorgio Maone’s hackademix blog
  • X-FRAME-OPTIONS in Firefox – Giorgio Maone’s hackademix blog
  • All That ClickJazz… – Giorgio Maone’s hackademix blog

My advice for all this? Just run the latest version of Firefox and install the awesomely protective NoScript add-on.  What’s that you say?  NoScript protects agains JavaScript threat’s and stuff like that, it doesn’t protect against clickjacking that is code-based?  Let NoScript’s developer clear things up:

Talking about rectifications, Security Watch’s apology of Microsoft’s take on Clickjacking protection, while defending X-FRAME-OPTIONS against the general skepticism from security experts, emphatically warned twice that “NoScript won’t protect you”. Larry Seltzer’s premise, “JavaScript is not required for the attack” was obviously correct, but unfortunately for him (and fortunately for Firefox users), NoScript doesn’t rely on script blocking to defeat the attack. He had apparently never heard about ClearClick, the specific anti-Clickjacking protection provided by NoScript, which is extremely effective even if JavaScript is enabled (or the attack is scriptless). Ironically, ClearClick is also the only available implementation of Michal Zalevski’s “favorite solution”, which his article even tries to explain.

User Experience Changes since Beta 2 - IEBog

  • Search box can display images for instant “visual search results”
  • Smart Address Bar now displays feed results optionally, autocomplete suggestion does not show entire sections, and more results are displayed in the list.
  • The Favorites Bar now allows you to customize the width of item titles so you can cram more on there without having to manually rename (or remove them). This is nice.
  • InPrivate Browsing and InPrivate Blocking have been tweaked so that they may be used separately.

Overview of Platform Improvements in IE8 RC1 – IEBlog – Light post that highlights some page design and standards handling improvements with IE8 along with performance and aspects for developers.

Enjoy.

--Claus V. 

Read More
Posted in browsers, Firefox, Internet Explorer, Microsoft, security | No comments

Saturday, January 31, 2009

Windows 7 News Roundup #6

Posted on 10:19 PM by Unknown

New round of posts related to Windows 7.

Overall, things have been fairly quiet. Either most folks are still deep in their bat-caves working out the Beta version or have become bored with the fact that it seems to just work well, and moved on.

Either way, it looks like a good thing for Microsoft.

  • Review: Windows 7 BitLocker and Windows 7 BitLocker to Go – Manageability – 4sysops blog.  Good digestible looks at W7 BitLocker implementation.

  • Disk Defragmentation – Background and Engineering the Windows 7 Improvements - Engineering Windows 7 blog – As someone who finds defragmentation fascinating for some reason, this review of how it has been implement in W7 was grand.  The GUI has been updated to be a bit more helpful for users.  From the post:

Among the other changes under the hood in Windows 7 are the following:

  • Defragmentation in Windows 7 is more comprehensive – many files that could not be re-located in Windows Vista or earlier versions can now be optimally re-placed. In particular, a lot of work was done to make various NTFS metadata files movable. This ability to relocate NTFS metadata files also benefits volume shrink, since it enables the system to pack all files and file system metadata more closely and free up space “at the end” which can be reclaimed if required.
  • If solid-state media is detected, Windows disables defragmentation on that disk. The physical nature of solid-state media is such that defragmentation is not needed and in fact, could decrease overall media lifetime in certain cases.
  • By default, defragmentation is disabled on Windows Server 2008 R2 (the Windows 7 server release). Given the variability of server workloads, defragmentation should be enabled and scheduled only by an administrator who understands those workloads.

Best practices for using defragmentation in Windows 7 are simple – you do not need to do anything! Defragmentation is scheduled to automatically run periodically and in the background with minimal impact to foreground activity.

  • Windows 7 Runs Faster Thanks to New Service Controller – OSnews post.

One of the reasons Windows 7 runs faster (faster start up, resume, shut down, less churn during user sessions) is due to the re-engineering of how Windows maintains and activates services running in the background. Microsoft's Channel 9 has an interesting video with a Windows kernel developer whose team designed a new trigger-based service controller that enables service developers to mark services as needing to run only when certain conditions are met. This means Windows 7 can more intelligently manage when to make resources avaiable for services that employ this trigger pattern for starting and stopping. Less code that runs at any given time means Windows 7 has more resources available for foreground processes that impact users interacting with the OS. The net effect of this for users is a snappier OS.

  • Showcasing Windows 7 Platform with Applets - Engineering Windows 7 blog – Look into how several mini-applications and features have been redesigned and integrated in W7.  To me the interesting stuff was buried at the very end: Restart and Recovery.  Besides giving good feedback and trouble-logging for administrators, I wonder what value it might contain for forensics folks as well.

The Windows Error Reporting (WER) infrastructure is a set of feedback technologies that is built into Windows 7 and other earlier versions of Windows client and server. WER allows applications to register for application failures and capture this data for end-users who agree to report it. This data can be accessed and analyzed and can be used to monitor error trends and download debug information to help developers and ISVs determine the root cause for application failures.

Related to failure recovery, Applications can also register with WER for restart on application of a Windows patch that terminates the application and on application of an update that reboots the computer, as well as failure caused due to an application crash or hang or not responding state. Applications can optionally register for recovery of lost data, can develop their own mechanism for recovery.

Several Windows applications adopt the WER infrastructure to collect and analyze data. Calculator, Paint and Wordpad register for restart and additionally recover the current data in the sessions of the application that were running. Sticky Notes also registers for restart and recovery, and returns the user to the set of notes open on the desktop. Using WER, end-users would allow Windows to capture and collect problem data and then would be returned to the applications in the same state that they were in earlier.

  • Our Next Engineering Milestone - Engineering Windows 7 blog. The engineering team is doing some major (and deserved) chest thumping here.  They run down the progress and stability they have achieved in the Beta version of W7. It is pretty remarkable that it is able to use most all drivers and software that is already Vista supported, and more drivers are being developed. They also recognize the contributions of Beta testers both with automatic and manual feedback. Then they move on to the release schedule discussion thusly:

So to summarize briefly:

  • Pre-Beta – This release at the PDC introduced the developer community to Windows 7 and represents the platform complete release and disclosure of the features.
  • Beta – This release provided a couple of million folks the opportunity to use feature complete Windows 7 while also providing the telemetry and feedback necessary for us to validate the quality, reliability, compatibility, and experience of Windows 7. As we said, we are working with our partners across the ecosystem to make sure that testing and validation and development of Windows 7-based products begins to enter final phases as we move through the Beta.
  • Release Candidate (RC) – This release will be Windows 7 as we intend to ship it. We will continue to listen to feedback and telemetry with the focus on addressing only the most critical issues that arise. We will be very clear in communicating any changes that have a visible impact on the product. This release allows the whole ecosystem to reach a known state together and make sure that we are all ready together for the Release to Manufacturing. Once we get to RC, the whole ecosystem is in “dress rehearsal” mode for the next steps.
  • Release to Manufacturing (RTM) – This release is the final Windows 7 as we intend to make available to PC makers and for retail and volume license products.
  • General Availability (GA) – This is a business milestone and represents when you can buy Windows 7 pre-installed on PCs or as full packaged product.

The obvious question is that we know the Pre-Beta was October 28, 2008, and the Beta was January 7th, so when is the Release Candidate and RTM? The answer is forthcoming.

  • Quickpost: Vigenère Is Beta-Only - Didier Stevens. Turns out Microsoft is only using this technique for an additional warning for folks not to mess around without expecting consequences.  Kinda of like saying, stay out, but if you do muck around here, we warned you.  They will be returning to the ROT-13 scheme in final versions of W7.

  • Windows 7: Why Microsoft Should Give Windows 7 Away – Gizmodo thinks that Windows users have been burned enough.  Especially after that Vista release mess.  In an effort to show good will to all men (and women), the argument goes that maybe Microsoft should offer it at bargain-basement rates to encourage Vista adopters to move on to a better implementation.  It would be the Right Thing to do. (Don’t hold your breath for this one.)

  • Windows 7 to be “thoroughly” tested by antitrust regulators – ComputerWorld – Right. With that whole economic downturn thing giving states the blues, and reduced revenue intake, and the EU leading the windmill tilting efforts against Microsoft, why not see if you can squeeze some more anti-trust blood from Microsoft out of a new OS release?  I mean it’s so hard to find another alterative OS that is consumer oriented now days.  We are just poor victims of Redmond’s continued dominance and bullying. Right?

  • Windows 7 Beta: Virtual Roundtable with Mark Russinovich – Ask the Performance Team blog. Mark down your calendars for Feb 12th then Mark Russinovich leads a roundtable discussion on some new highpoints for Windows 7.  Considering all the discussions and Beta testing, it should be a lively and informative presentation. Topics scheduled are so noted:
  • Learn about the evolution of features such as:

    • Group Policy
    • BitLocker to Go
    • DirectAccess
    • BranchCache
    • Software Restriction.

    In addition to a discussion of the new features there will also be information and tips on Windows 7 Troubleshooting, Application Compatibility and Deployment.

  • Windows 7 Tip: How to Burn ISOs in Windows 7 – Lifehacker. Burning stuff in XP is such a pain. I haven’t tried it in Vista as I got used to having so many alternative freeware burning applications I wouldn’t think of using something embedded in the OS.  However, it looks like W7 might be too simple not to use.  Considering how ubiquitous ISO files are now, and the confusion consumers and noobies still show when offered and instructed to burn an ISO to disk, having an easy-to-use solution for everyone makes sense.

The W7 UAC “Firestorm”

Not sure anyone was expecting this melee to break out.

  • Sacrificing security for usability: UAC security flaw in Windows 7 beta (with proof of concept code) – istartedsomething blog

  • Malware can turn off UAC in Windows 7; "By design" says Microsoft - Within Windows blog

  • Microsoft dismisses Windows 7 UAC security flaw, continues to insist it is “by design” – istartedsomething blog

  • TechBlog: Windows 7’s UAC is now insecure “by design”

So what’s the big deal? Well, W7’s UAC got tweaked to allow a finer degree of control. It ranges from “death-row lockdown” to “asleep at the wheel” depending on your comfort level. What Long and Rafael found out is that (under an administrator-level account) a script (or malware or whatever) can run and turn UAC down or off.  Kinda a dangerous thing.  And they called Microsoft out for it.  To which Microsoft said basically, um, yeah, we implemented it that way on purpose.

To their credit, I have to imagine long nights were spend by teams of security, user-operability, and engineering teams screaming and yelling and taking contract hits out on each other.  In the end the user-operability team seemed to have watched The Godfather movies the best and walked away the winners.

Frequent TechBlog commenter Master Guru pointed out the following observation: the ability to modify UAC settings (via script or program) appears to only work while operating under an administrator-level security account.  If you are working under a normal “user-level” account, the “feature” doesn’t work and requires elevation by an administrative level user. Makes sense and is fair enough. Only the default account setup by Windows 7 is an administrative level one.  And many (most) Windows users who set up accounts do so and run under administrative accounts. This is arguably either due to lack of knowledge of the security benefits that come from running under a limited account or because they do know better but just don’t want to fuss with the headaches that some software causes when used under that limited account. Those who don’t probably are restricted by corporate/enterprise policy restrictions by folks who know better or savvy and disciplined users who appreciate the benefits his arrangement provides.

Me? I just want everyone to feel the love.  Microsoft should do more to guide users who set up accounts under W7 to opt for the more limited (but still functional) standard-user account level.  They should also heed Long Zheng’s plea to at least “…force a UAC prompt in Secure Desktop mode whenever UAC is changed, regardless of its current state.”

--Claus Valca

Read More
Posted in Link Fest, Microsoft, Windows 7 | No comments

Security and Forensics Roundup: Heavy Version #5

Posted on 5:16 PM by Unknown

070824-F-5957S-367

Public domain photo: taken by U.S. Air Force Senior Airman Julianne Showalter

Anti-Malware news

  • VIPRE PC Rescue - (freeware) - Sunbelt Software is now offering a “standalone” anti-malware scanning/removal tool.  The self-extracting executable is updated daily with the latest signatures. Scans include rootkit detection.  “Four command line options are available, enabling the program to perform a boot scan during the next start-up, perform a deep scan, log the events, and disabling the rootkit.”  I really like the fact that not only can you download and execute it from the net, but you can keep it packed/unpacked on a USB stick and run from there.  I’ve been using the full VIPRE product from Sunbelt Software for a while now and am very impressed with it.  A full GSD review on both should be coming soon.  Sunbelt reports that they will be providing a guide on how to use VIPRE PC Rescue with a bootCD for non-bootable system use. Sounds like a great add-on for VistaPE or other WinPE based boot disks. Spotted via the Sunbelt Blog.
  • Portable Anti-Virus/Malware Security Tools: A Primer – earlier (related) Grand Stream Dreams post. Looks like I am going to have to do an updated post to add VIPRE PC Rescue to it.  If you haven’t seen that post back and you liked the VIPRE PC Rescue product, visit that one to snag some more soldiers for your battles.
  • A bit of VIPRE roadmap – Sunbelt Blog. I’m really pleased with VIPRE and the performance it offers across our home systems.  It is easy to use and the girls never ask me questions about what it is doing.  Alex’s crack development team is hard at work making it even better.  Not only is the core detection engine about to be upgraded, but it will also include a feature called MX-Virtualization technology (MX-V). As Alex explains it, MX-V will provide “…an extremely compact virtualized Windows environment to test for the presence of malware.”

In the MX-V system, malware is executed in a virtual Windows environment that mimics many of the core Windows functions -- registry, file system, internet connection, mouse clicks, etc. The actions of the malware are then analyzed for behavioral characteristics common to malware, or to look for certain malware signatures. By analyzing malware in this fashion, VIPRE is able to detect many types of malware without the necessity of creating a constant stream of dedicated unpackers and signatures for each variant of a piece of malware.

  • Spybot-S&D – v1.6.2 Released - (freeware) – Granted, I rarely turn to this tool much anymore.  With VIPRE running, and the other portable anti-malware tools and other anti-malware tools and core Windows system utilities at my disposal, I have more options than ever before. However it is hard to leave it behind and I keep it updated anyway.  According to the post this latest version now includes support for “…the latest Opera releases, support for Googles new browser Chrome, fixed support for fresh older Firefox installations, improved support for fast user switching while Spybot is running, plus a few more bugfixes.”  Tantalizingly, they also mention that a preview release of Spybot S&D 2.0 will be available soon. No link to download just yet but fans of Spybot S&D can drool over these Spybot 2.0 alpha screenshots buried in their official forum.
  • Ad-Aware Free Anniversary Edition 8.0 - (freeware) – This latest version looks even more 2.0 in the GUI.  To be honest, I haven’t used Ad-Aware for a very long time (ever since the SE version got dumped and it failed to be able to be run off a USB stick). This version claims improved performance and tweaks, rootkit removal support, and integration with Windows Security Center for what its worth.
  • hype-free: Can you test AV using VirusTotal? – cdman83’s thoughtful blog post on the merits of VirusTotal and a lively follow-on comments discussion. Basically, I think it comes down to understanding that these on-line scan services act as a line to examine an unknown suspect file to see if if contains or exhibits malicious code.  It is not a test or comparison of the performance (efficacy)  of some AV/AM products over others. At least that’s how I’ve always looked at it.  Keep these services in context and use them as a first-response tool to examine a suspect executable/file. Understand the limitations and that just because a submitted sample passes/fails, doesn’t necessarily mean anything.  It is just data to be used as part of a skilled responder’s analysis of the file and possible threat.  As cdman83’s comments and supporting links indicate, having a accurate understanding of their strengths and weaknesses leads should lead to more realistic usage and results interpretations.

Drive Encryption and Authentication

  • Caviar 2TB – When I first got my 500GB HDD for our desktop system, I thought, geez. That’s too much.  Now, with a price-point of about $299, I’m wondering how I can get one for our home.  It’s SATA so I couldn’t (easily) use it on my current system, but a future system upgrade might provide a home.  Holy Hopscotch!  2TB.  I’m trying to get my mind around that.  I don’t yet find any TB-level drives for laptops just yet.  These Newegg offered 500GB drives are the closest.  Yet at about a $100 price-point, they also seem too good to pass on. 
  • Hard drive manufacturers back new disk encryption standard - Ars Technica.  Instead of a software-based HDD solution, drive manufactures are attempting to deal with it at a firmware level.  Ars points out that while drive encryption does provide data protection, it does not solve the issue with hardware protection and while data might be safe, the drive could be possibly be reformatted or replaced (at minimal cost).  And these only protect systems/data at rest.  As we have seen, hackers can successfully intercept unencrypted data one the disk-encryption has been decoded after successful boot with rootkits, trojans, data-sniffers, etc.  As we are finding out ourselves at work, Whole Disk Encryption also poses challenges for IT system support.  It’s hard to remote-boot/access a WDE system.  Use of tokens or a common administrator access code lowers the security the system is supposed to protect.  With WDE we are unable (kinda) to OS boot a system to perform any form of on or off-line service and troubleshooting unless we use a token that erases the user’s code (then they have to pick a new one) or ask the user to give us theirs to use.  At least it’s a start in the right direction.
  • Binary Intelligence: Encrypted Drive Standard – links to the official standards.
  • CYB3RCRIM3: Authentication and the Erased Hard Drive – Interesting legal case where the defendant requested provision of the police investigation’s hard-drive (for the system used to communicate with the defendant in on-line chat sessions)…which ended up getting erased, thus according to the defendant, prevented his defense in attempting to authenticate/disprove the official record/logs provided against him by law enforcement.  Computer forensic experts are all over handling the suspect drive with duplication and chain of custody control.  But it raises a question to this layperson…is the same process handled when a law-enforcement drive is used during an investigation? Anyone care to comment?
  • End to End Encryption is NOT the PCI Silver Bullet! - Branden Williams’ Security Convergence Blog – Wonderful perspective.  Yes, the Heartland credit processor appears to have been victimized by malware code lurking in the unallocated file space.  Yes, whole drive encryption, and encryption of PCI data while transmitted helps.  But even at some basic level, critical data must be unencrypted to be used by the system or system points. Those will always be the chinks in the armor. Constant Vigilance! as Mad-Eye Moody might say is probably the only solution.
  • Going back to the whole disk encryption thought, don’t forget that there are (at least) two long-running free programs that you might consider looking into; CompuSec and TrueCrypt. It will at least keep your data safe in the event of system theft.

Mostly Forensics

  • Free SANS Forensic Training for Local Law Enforcement - SANS Computer Forensics, Investigation, and Response blog – SANS forensics course program allows federal law enforcement officers who sign up for the class to bring along a local law enforcement officer with them for a free training “ride-along".  That’s neat!
  • Forensic Incident Response: Using RegRipper – Hogfly offers up some additional applications for using Harlan’s great Regripper tool.  System Admins take note.
  • Windows Incident Response: Catching up... – Harlan has been hard at work on finishing the next edition of his computer forensics book.  However, this post shows that he has still managed to keep a close on on great sources of forensics information and developments in the field.  All great links.
  • Ascension Blog » Digital Forensics – Links to a paper by Ian Charters directed towards “..the laymen and explores how digital forensics has evolved over the years.” Neither deep or technical, it does provide a nice overview on digital forensics and the issues the field has gone through.
  • Dates from Unallocated Space -  « SANS Computer Forensics, Investigation, and Response – short but interesting piece.  Useful not just for forensics crowd but also for system administrators working on a system.

Security Stuff

  • Heartland Sniffer Hid In Unallocated Portion Of Disk – gcisecurity blog – more details on how Heartland got hacked.
  • Conficker/Downadup Scanning – SANS ISC Handler’s Diary post about network scanning characteristics of this baddie.
  • TinyURL Security Issues Revealed – InfoSecurity blog and Finjan MCRC Blog 2009 - Evasive URL techniques – Turns out that use of a “tinyURL” link often will cause bypass of many web-based “safe-browsing” url link scanners.  Yet another reason to beware of these links without checking them out first.  I’m still waiting for a Firefox 3.x version compatible release of Long URL Please.
  • IT Security Expert: Monster Jan09 breach: The Website Passwords Problem – Oh my.  Dave Whitelegg goes to task on Monster for numerous problems with their security model.  If you have a Monster.com account or deal with website security, it’s a good read.
  • Monster.com - They Just Don’ Get It! | Infosec Ramblings – Kevin picks up on Monster’s beatdown where Dave left off.  Where is the SSL encryption? Not anywhere Dave can find!
  • Test your defenses against malicious USB flash drives - Computerworld Blogs – Long and detailed discussion of issues related to USB devices.  We’ve already covered it a lot at GSD before here and again here, but this is another great reminder and perspective.
  • New Tool: wlan2eth – New find for the network security folks from Josh Wright:
  • “Wlan2eth is a simple tool to convert packet captures in 802.11 format to Ethernet format.  Lots of tools can only understand Ethernet link types, so I wrote this tool to convert captures to a format that they can understand.

    “For each packet in an input 802.11 capture file, wlan2eth examines header values to ensure it is a data frame, then it creates a new output packet with an appropriate Ethernet header (source and destination address and embedded protocol field are preserved from the 802.11/802.2 header).  Timestamps are also preserved from the original capture.

    “This tool is really only useful for encrypted traffic, though you could use it with a tool such as airdecap-ng to decrypt an encrypted capture first, then convert the unencrypted output file to Ethernet format.”

  • VRT: Dial-up Security woes in East Africa - Alain Zidouemba goes on a trip to visit family in East Africa and finds that pervasive use of dial-up Internet access brings headaches.  Couple that with plans that are minute-based, big DAT files and security patch updates from vendors often discourage security updating of software and systems.  In a growing consumer broadband centric world, what options exist for keeping these folks and systems safe and current?  Yes, I know folks can use a variety of off-line system patching solutions, all are great, but unless you still have access to a broadband connection or friend with one, systems for these users often end up being on the front-line of computer security battles, and cannon-fodder.  The post is a good read.

Keep Safe.

--Claus V.

Read More
Posted in malware tools, security | No comments
Newer Posts Older Posts Home
Subscribe to: Posts (Atom)

Popular Posts

  • New Year’s Day - First Post 2011
    Same day I came out with my first post after a long drought, I fell upon this article Blogging Seems To Have Peaked, Says Pew Report over a...
  • Finally! Time to Post! New material list
    After a recent text from my bro reminding me it has been since March since I’ve done a blog post, I was finally able to clear the schedule a...
  • Oscar watch Linkpost
    Alvis and Lavie are watching the Oscars tonight and I’m along for the ride. I wasn’t able to come even close to getting out some of the pos...
  • Ubuntu 13.10 Upgrade - Lessons Learned & VIDMA utility found
    A few weeks ago a new release of Ubuntu came out. Naturally that meant it was update time! I have been getting pretty good at this now so ...
  • iodd : Multi-boot madness!
    Like many computer technicians and responders, I seem to always have at hand a collection of bootable media; CD’s, DVD’s, USB-HDD’s, flash m...
  • Network Capture Tools and Utilities
    At a conference this week, we had quite a section regarding network captures. The instructor was going on about how you can try to sort ou...
  • Mostly Minor Network Notes
    Here are some minor tweaks and features, mostly of a network nature. Manual Uninstall of the Cisco VPN Client « Mobile Expertise -- becaus...
  • It just has to be bigger on the inside…
      Last Christmas, Lavie gifted me with a cute little Jawbone JAMBOX unit. I thought it was pretty cool. It uses a Bluetooth connection t...
  • Windows Live Mail error 0x80041161
    Dad is working with his father-in-law who has an issue with his Suddenlink web-mail-based “forwarding” handling of messages. Seems that (an...
  • FireCAT 1.5 “Plus” Add-On Collection
    In yesterday’s GSD post I noted the following: Both of these tools brought be back to the excellent FireCAT 1.5 collection of Firefox...

Categories

  • Active Directory
  • anti-virus software
  • Apple
  • architecture
  • art
  • AVG
  • Blogger
  • blogging
  • books
  • boot-cd's
  • browsers
  • cars
  • cell-phones
  • cheat sheets
  • Chrome/Chromium
  • command-line interface
  • cooking
  • crafts
  • crazy
  • curmudgeon
  • DHC
  • Dr. Who
  • E-P1
  • Education
  • family
  • Firefox
  • firewalls
  • For the Gentleman
  • forensics
  • Gmail
  • Google
  • graphics
  • hacks
  • hardware
  • humor
  • hurricanes
  • imagex
  • Internet Explorer
  • iOS
  • iPhone
  • iPod
  • iTunes
  • Kindle
  • Learning
  • Link Fest
  • Linux
  • malware tools
  • Microsoft
  • movies
  • music
  • networking
  • NewsFox
  • NFAT
  • Nook
  • Opera
  • organization
  • PDF's
  • photography
  • politics
  • PowerShell
  • recipes
  • Remote Support
  • RSS
  • science
  • Scripting
  • search engines
  • security
  • Shuttle SFF
  • software
  • Texana
  • Thunderbird
  • troubleshooting
  • TrueCrypt
  • tutorials
  • utilities
  • VBscript
  • video
  • Virtual PC
  • virtualization
  • viruses
  • Vista
  • Vista mods
  • wallpapers
  • Win FE
  • Win PE
  • Win RE
  • Windows 7
  • Windows 8
  • Windows Home Server
  • Windows Live Writer
  • Windows Phone
  • writing
  • XP
  • XP mods
  • Xplico

Blog Archive

  • ▼  2013 (83)
    • ▼  November (8)
      • Ubuntu 13.10 Upgrade - Lessons Learned & VIDMA uti...
      • ForSec Linkfest - 2013 DST Fallback Edition
      • CryptoLocker Ransomware Info & Free Prevention Sol...
      • Linkfest for the SysAdmins
      • Microsoft Security Essentials/Defender & PowerShell
      • Miscellaneous TrueCrypt linkage
      • PowerShell 4.0 and a tiny “gotcha”
      • New Software Updates + VMware Tools Update fix
    • ►  October (8)
    • ►  September (14)
    • ►  August (6)
    • ►  July (10)
    • ►  June (10)
    • ►  April (11)
    • ►  March (6)
    • ►  February (7)
    • ►  January (3)
  • ►  2012 (96)
    • ►  December (8)
    • ►  November (4)
    • ►  October (9)
    • ►  September (8)
    • ►  August (12)
    • ►  July (4)
    • ►  June (3)
    • ►  May (7)
    • ►  April (13)
    • ►  March (3)
    • ►  February (5)
    • ►  January (20)
  • ►  2011 (41)
    • ►  December (8)
    • ►  November (7)
    • ►  September (4)
    • ►  August (4)
    • ►  July (2)
    • ►  June (6)
    • ►  March (5)
    • ►  February (1)
    • ►  January (4)
  • ►  2010 (69)
    • ►  December (1)
    • ►  October (3)
    • ►  September (2)
    • ►  August (13)
    • ►  July (17)
    • ►  June (3)
    • ►  May (3)
    • ►  April (3)
    • ►  March (11)
    • ►  February (1)
    • ►  January (12)
  • ►  2009 (177)
    • ►  December (20)
    • ►  November (11)
    • ►  October (7)
    • ►  September (7)
    • ►  August (21)
    • ►  July (17)
    • ►  June (7)
    • ►  May (18)
    • ►  April (9)
    • ►  March (17)
    • ►  February (23)
    • ►  January (20)
  • ►  2008 (35)
    • ►  December (23)
    • ►  November (12)
Powered by Blogger.

About Me

Unknown
View my complete profile